Chicken Pot Pie

This is a classic recipe for a cold day and left over chicken. It’s hearty and flavorful and downright yummy. It seems like a lot of ingredients, but you can omit something if you don’t have it on hand.

Chicken Pot Pie Ingredients:

3 sticks celery, chopped

1 med. onion, chopped

2-3 carrots, chopped

3 cloves garlic, minced or pressed

1 red bell pepper

3-6 baby bella or button mushrooms

½ C. frozen green peas

2 C. cooked chicken

2 tbs. butter

¼ C. flour

Chicken stock

¼ C. cream

Tarragon (fresh or dried)

Salt & pepper

Olive oil

1 egg (for the egg wash)

Preheat oven to 400

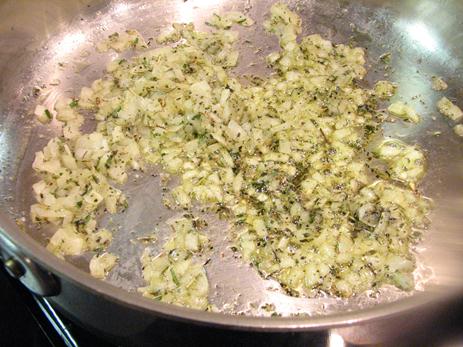
Heat a large sauté pan with olive oil and add onion and season with salt. Let the onion sweat for a few minutes, then add the celery, carrots, garlic and bell pepper. Add about ½ C. chicken stock and let it cook for about 5 minutes until the vegetables are soft. Add the mushroom and continue to sauté. Add more liquid if it starts to get a little dry.

When the veggies are soft, pour into a bowl and set aside. In the same sauté pan add two tablespoons of butter and melt until bubbly. Pour ½ of chicken stock into a cup and add 2 tablespoons of flour. Stir well with a small whisk or fork. When the butter is bubbly pour the flour mixture in to create a roux. Whisk vigorously to cook the flour. When the mixture starts to thicken, add chicken stock, whisking the whole time. It may be a little lumpy at first, but keep whisking and it will become satin smooth.

Season with salt and pepper. Add the cream and bring it to a simmer. Then add the chicken. (I use leftover roast chicken.) Add the veggies back into the mix. And very last add the peas.

Add tarragon and salt and pepper. Get it all hot and bubbly. Then add to the crust/pot.

Cover with the top crust and brush with egg wash to make it GBD. Stick it in the oven at 400 degrees for 45 min or until the crust is golden brown delicious.

Now for the Crust ….

This is an old-school crust and not as easy to work with as the Never Fail Pie Crust. But this makes for a delicious, flaky and savory crust.

Pie crust ingredients:

2/3 C. Crisco

2 C. AP flour

1 Tsp salt

3-6 Tbs cold water

Cut the shortening into the flour and salt until it makes a crumbly pastry. Then add the water a tablespoon at a time until it just comes together.

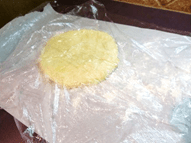
This dough is stiff so don’t worry if it’s seems difficult to handle. divide the dough in half. Sandwich the first half between plastic wrap to roll out. This is one of the handiest tricks. By placing the dough between sheets of plastic wrap, you eliminate the need to add extra flour to the dough, which will make the dough tough. Also you can rotate the dough around to roll it out evenly. Plus, it’s super easy to clean up afterward.

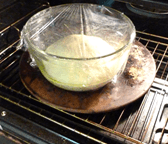
To prepare the dough/pot, you need to prebake the shell for about 10 minutes. This keeps the dough from getting too soggy. The plastic wrap trick makes it easy to put your crust into the pot, with is very helpful since the dough is very crumbly. I use copper pennies as pie weights.

Bake the shell for about 10 minutes, take it out of the oven and fill with the veggie/chicken mixture. (see above for instructions)

Happy Eats, Y’all.

Pizza Pie

A good homemade pizza pie is a wonderful thing. This is not Viktor’s Special, but it’s my special version and it’s always a crowd pleaser.

Ingredients:

1 ¾ to 2 C. bread flour (plus more for kneading)

¾ C. Warm water (110 degrees)

¼ C. Olive oil

1 Tsp Rapid rise yeast

1 Tbs Honey or sugar

1 Tsp Salt

Add yeast to the warm water, add the sugar/honey. Give it a stir and let it stand for a couple minutes. It should be foamy and opaque after a few minutes. Mix the flour and salt together and set aside. (All-purpose flour can be used instead of bread flour.)

Create a well in the bottom of the bowl with the flour. Add the water mixture and oil. Mix together until the dough comes together. Add more flour if needed. Tonight I started with 1 ¾ flour but added ½ cup more because it was a really humid day here and my dough was too sticky otherwise.

Turn it out and knead for a few minutes. Pizza dough should be on the wet and sticky side.

Form into a ball and grease bowl well with more olive oil. Toss the dough in the bowl to coat with oil. Put the dough in a warm place to rise until doubled, about 1 to 1 ½ hours. I like to heat my oven up to about 150 degrees, then turn it off to let it start to cool, then I put the dough in to rise.

After it has risen, punch down and add a tablespoon or so of flour to the dough and knead lightly for a few turns inside the bowl. Get your oven going again by preheating it to 475 degrees. (note that my pizza stone is already in the oven here). if you don’t have a pizza stone, no problem. You can bake your pizza on a cookie sheet or pizza pan instead.

Pull out onto a large piece of cling wrap (I stitch two pieces together with the seam in the middle). Dust the top of the dough with flour. Place a sheet of parchment paper over the dough and flip to the parchment side—cling-wrap side up. Add a little more flour if needed. Roll the dough out to a 14-inch round or larger. When you are happy with the shape and thickness of the pizza crust, leave it to rest for at least 10 minutes.

This pizza pan has been through it all. I bought this when I was in college and moved into an apartment for the first time. I didn’t have anything that resembled a cookie sheet or pizza pan. I couldn’t afford both so I got this so it could do double duty. It has been one of the cheapest and handiest of kitchen utilities. 20 years later I’m still using it almost daily to make everything from cinnamon toast to biscuits. I’m about to use it in place of a pizza peel (that’s one of those wooden paddle-looking-things with a long handle – the pizza bakers slide pies in and out of the wood burning ovens with the peel.)

Slide the pan (or cookie sheet) under the dough and beneath the parchment. This is how we’re getting the dough onto the pizza stone. Remember pizza dough is sticky and once the pie is loaded up, it’s heavy. After you get it on the pan, take the cling wrap off. Ta-dah.

Now we’re ready to put on the toppings. Use your favorite bottled sauce or you can make a quickie sauce. Spread the sauce around. Add the meat of choice (or not). Here I’m using pepperoni and sausage. No need to brown the sausage prior, it will thoroughly cook in the overall process. Add your veggies. In this pie, I’m adding green and black olives with orange bell pepper. It’s really about what you like at this point. If you want to skip the whole thing you can. Top with mozzarella cheese.


Slide the pizza onto the stone inside the oven. The parchment can go right on top of the pizza stone.  (I only have 2 hands so, that was impossible to capture in photos. Sorry, y’all)

Look, Elvis Parsley is watching the pizza cook.

OMG! I have died and gone to pizza heaven. And, Yes! It is worth it to make your very own homemade pizza pie.

Pizza heaven!

Quickie Pizza Sauce

This is one of the most ridiculous little recipes, but it works so well. I developed it out of necessity. I was hosting a small party once and pizza was to be the appetizer and, well, I thought I had jarred pizza sauce, but didn’t, and it was too late for a last-minute grocery run. So I improvised and it worked. I got tons of compliments on the sauce. (Pizza recipe.)

Ingredients:

1 small can tomato sauce

1-3 Tbs Italian season mix

1-2 garlic cloves, finely minced or run thru a garlic press (or 1 tsp of ground if you don’t have fresh)

1 squirt of Anchovy paste

1 Tbs sugar

2 Tbs Parmesan cheese

Salt & pepper

Throw it all together and give it a stir. Feel free to ad lib here. If you don’t like or have any of the ingredients, don’t use it. Or if you want to make a substitution, do it. Dried Italian parsley works well if you don’t have an Italian herb blend. You can add more or less of anything or you could add something extra or completely different.

But please do try the anchovy paste … it adds a depth of flavor that will astonish you. It only takes a small squirt, about a ½ tsp. IMHO, it’s what makes the sauce.

Ta-dah! It’s really tasty and so easy. Use with your favorite pizza recipe.

Mexican Chocolate Cookies

This is a gem of a cookie recipe. And the best part is that it’s a “light” recipe. I very first found this recipe in one of my Cooking Light magazines. Cayenne is the secret ingredient, which adds a great punch of complexity that you can’t place, but know it’s what makes it all work. I don’t know what it is, but chocolate and red pepper go so well together.

The key to making this a wonderfully scrumptious recipe is to use really good chocolate. It needs to be bittersweet with 60% cacao minimum. Good brands that are easily available are Ghirardelli, Lindt and Baker’s. Don’t forget to look in the “candy” aisle for the good chocolate.

If you can get to a luxury grocery store, like Central Market, you can find tons of good chocolate. Scharffenberger is the very best American chocolate (HSO). Valharona is overpriced and overrated (another HSO). (HSO=Hot Sports Opinion).

If chocolate is the star of the recipe, use the good stuff. Life is too short for crappy chocolate regardless. For other recipes with Scharffenberger see Chocolate Covered Strawberries.

Just remember mediocre chocolate = mediocre results.

Very respectable American Chocolate from San Francisco.
30-second intervals will keep you from scortching the chocolate.
Satin-smooth chocolate.

This is perfectly melted chocolate. Look how shiny and smooth it is.

Cayenne is the perfect complement to chocolate.

You don’t want to pinch cayenne pepper with your fingers. The oils adhere to your skin and God forgive you if you accidentally rub your eye or nose (or any other precious body part with tender skin!). This is the dandiest trick to adding just the right amount of cayenne. Stick your knife into the spice bottle and get a dab on the tip of the knife and add to the dry ingredients. If you would rather use measuring spoons, it will be equivalent to about 1/8 of a tsp.

Butter, sugar and a farm fresh egg.

It’s hard to believe this recipe only has a ¼ stick of butter in it. Just for reference, traditional chocolate chip cookies have 1 cup of butter (4x the butter in this recipe). Believe me, the two greatest flavor-adding ingredients are butter and bacon grease.

Sous chef Jean-Guilliam.

I had my favorite sous chef in the kitchen today. I love cooking with my little boy. Hopefully he will know a few recipes by the time he’s 12 or 13 and can be responsible for cooking a meal a week (totally ripped this trick off from Dr. Jen.)

We drank a keg of this and I still love it. (It took us a few weeks to drink the keg, BTW)

It is Friday night, after all. And the best way to keep from eating all the dough is to drink a beer while you work. Beer and cookie dough is a no go.

Tasting the product. Always a good sign in an aspiring chef.
Payoff. Licking the beaters.

If the dough is good the cookie will be even better.

After 10 minutes in the oven, this is the outcome!

The cookies will have a slight crackling to them. This is perfect. When you break them open, the outer shell should be crispy.

Chocolate awesomeness! Crispy on the outside and chewy, moist greatness inside..
Powdered sugar makes it pretty.

A little dusting of powdered sugar for a festive look … and vla. Chocolate cookie awesomeness.

Mexican Chocolate Cookies

5 oz. bittersweet chocolate

3.4 oz. all-purpose flour (3/4 cup)

½ tsp ground cinnamon

¼ tsp baking powder

¼ tsp salt

Dash of pepper

Dash of cayenne

1 ¼ c. sugar

¼ c. butter, softened

1 large egg

1 tsp vanilla

Preheat oven to 350 degrees.

Put chocolate in glass bowl and microwave in 30-second intervals, stirring in between, until just melted. Set aside to cool.

Weigh or measure the flour and put in a small bowl. Add cinnamon, baking powder, salt, pepper and cayenne. Give all the dry ingredients a stir.

In a separate (and larger bowl), beat the [soft] butter and sugar. Add the egg and vanilla and continue to beat until just combined. Add the cooled chocolate. Beat for a few more seconds, then add the dry ingredients by stirring it in until just mixed. Use a tablespoon or scoop to drop uniform dollops of dough on an ungreased cookie sheet. Bake for about 10 minutes, until cookies are just set. When cooked, remove from the oven and transfer to a wire rack to cool.

Makes 32ish cookies.

Enjoy, Y’all.

Thanks Forgetting

Twenty-six days in to a blog a day and I almost didn’t get this one in …

  1. In goes the turkey

    Yep. Fried trukey, y'all.
  2. Out comes the turkey

    An hour later = GBD (code for Golden Brown Delicious)
  3. There’s a bunch left over, still.

    it's at least 10 lbs of turkey
  4. There is still about 45 pages left … and this is part of the reason why I almost forgot to post my blog tonight.

    Forget Thrilla in Manilla ... this suspense rules in Stockholm.

Lots of food, barking dogs, noisy kids, squawking birds and belly aches… I think I really need a detox and botox for that matter. Let’s just give thanks that Thanksgiving is almost over.

(Fried turkey post to come…)

Simple Sunday Supper

Today has been a simple day. Church, lunch and an afternoon with family watching movies and reading books. It has been a nice day just the three of us.

It seemed only right for us to have a simple, traditional meal. Meatloaf, mashed potatoes and broccoli.

Ingredients

2 lbs. of ground beef (chuck or round)

1 medium onion, diced

2-3 tbs parsley, chopped (Italian parsley, don’t mess with the curled stuff—it’s bitter)

2-3 cloves garlic, minced

1 to 1 ½ cups oats

1 bell pepper, diced (optional)

1 egg

1 small can tomato sauce

Salt and pepper

Oats ... that's what I use instead of bread.

Dump all the ingredients in and give it a stir.

Tomato sauce and a stir.

Then add the tomato sauce and egg.

One fresh egg.

I always put my meatloaf in a cast iron skillet. You can use a loaf pan or Pyrex dish.

Everyone should have a well-seasoned iron skillet.

Cast iron is an awesome conductor of heat.

Press the meat into the pan. Next make the topper (this is optional).

A sweet ketchup-based sauce does the trick.

Topping

½ c. ketchup

1 tbs mustard

¼ c. brown sugar

2 tbs. whole grain mustard

Salt and pepper

Top with the sauce.

Pour on top, spread out to the edges. Then place the pan in a 375 degree oven. Bake for 45 min or until done all the way through.

Baked to perfection.

Yummy! Sunday supper.

Sugar Squash Dumplings

I recently discovered an awesome fall squash called sweet dumpling. Like most fall squash, it’s versatile and easy to cook. And it is so sweet. And the name of the squash itself gave me the idea for making a squash filling to go into a dumpling.

Sweet dumpling squash. I was able to take a picture of this before the sun went down. Amazing what natural light will do for a photo.
You can use this same basic method to cook all fall squash.
Baked sweet dumpling squash.
Mashed sweet dumpling squash. These photos are taken inside under harsh, yet inconsistent lighting.

To make dumplings we have to bake the squash first. Pre-heat the oven to 400 degrees. Cut the squash in half and hallow out the seeds with a spoon. Line a rimmed baking sheet with foil, give it a squirt of cooking spray and give the cut side of the squash a squirt too. Then place the squash cut-side down on the pan and put into the oven to bake for 30-40 minutes or until the flesh of the squash is fork tender. Scoop out the cooked squash, leaving the skin behind then mash the squash in a bowl.

Ingredients

3-4 C. cooked sweet dumpling squash (see above)

½ of a medium onion, finely diced

2-3 sprigs of rosemary, finely diced and divided. Half for the squash mixture and half for the butter sauce.

¼ to ½ stick of butter

½ C. Parmesan cheese

1/8 tsp ancho chili powder

1-2 tbs herbs de Provence

Wonton Wraps

Salt and pepper (not pictured)

(other equipment needed: bowl of water and a pastry brush)

While the squash is baking, finely dice the onion and sauté with butter and olive oil. Add herbs de Provence and a pinch of the rosemary. Salt and pepper to taste. Let it cook down until very soft. Then add the squash to the onion mixture and give it a good stir. Let it all simmer together, stirring constantly for 2-3 minutes. Remove from the heat, pour into a bowl and let cool for a few minutes, then add the Parmesan and rosemary. Add salt and pepper, if needed. But be careful, Parmesan is very salty on its own.

Add Parmesan and rosemary. Give a good stir.

Give it a good stir then add the chili powder.

A little chili goes a long way.

Put your wonton wrappers on a cutting board. You will need to work quickly because we will seal the wontons up using the water as the “glue.” But wontons are very sticky once they get wet so faster is better.

Put a dollop of squash mixture down on each wonton. It’s about 1 tablespoon of squash per square.

A dollop ...
Brush with water to seal the top and bottom of the wonton togethe.

Brush all four sides of the wonton with water, then put a second wrapper on top. Press together with your fingers. Be sure to get all the air out of the stuffed center part as possible. Then crimp the edges with a fork to seal it tightly. Place the dumplings on a flat surface until you can cook it. Get a large pot of water boiling then place the dumpling into the water to cook. You will have to do this in batches. Each batch will take about 3-4 minutes to cook.

Not the greatest photo, but hopefully you get the idea.
Out of the boiling water.

After the dumplings have cooked. Place them on a plate or cookie sheet. Don’t bunch them up into a bowl or they will clump together and tear when you try to move them.

Last step, toss the dumplings in brown butter sauce. To make the sauce, put a plug of butter into the pan, get it hot, add a little salt and pepper and a little pinch of the rosemary. When the butter is bubbly and starts to brown, add the dumplings, toss to coat with butter, add a pinch or two of rosemary. Let the dumplings toast and get a little brown.

Put on a plate and sprinkle a little Parmesan cheese on top. Yummy!

Sugar squash dumplings, y’all.

Pumpkin Pies – that taste good even though they aren’t perfect

I made this last week for the annual Thanksgiving family night dinner at my church. In preparation, I looked through several of my recipe books for a good one.

They all had the basic same ingredients except for one, which actually called for canned candied yams. Yep. Candied yams, which a good Ag woman knows that a yam is really just a sweet potato. Real Yams are imported from the Caribbean or Africa.

I’m a big fan of Cook’s Illustrated. It is by far one of the best producers of recipes in the U.S. They have new recipes but they also reexamine old favorites to get the best version of, say chocolate brownies. They definitely have a flog-it-to-death approach when it comes to research and trials and tasting. These magazines and cookbooks aren’t cheap but they don’t have any paid-for promotions, product endorsements or advertising.

Cook's Illustrated rocks!

I was feeling very sassy and took their recipe and deviated from it. (This is a big-time no-no. Baking is a science but it’s also an art—so until you get a feel for what you are doing, stick with the recipe.)

Pumpkin pie ingredients.

2 C. cream (you can use half n half)

3 Large eggs + 2 egg yolks (you will need a total of 5 eggs)

1 tsp. Vanilla

1 Can or (15 oz pumpkin puree)

1 Can candied yams (15 oz.)

¾ C. sugar

¼ C. Maple syrup

2 tsp. Grated fresh ginger

½ tsp Ground cinnamon

¼ tsp Ground fresh nutmeg

1 tsp Salt (use table salt)

1 Pie crust (see Never Fail Pie Crust or you can use the refrigerated, pre-made dough)

  1. You have to bake your crust a little before you put the filling in. Use pie weights or you can do what I did and line the pie crust with foil and throw a few pennies in as weights. Bake pie crust in 400 degree oven for 15 minutes. After the crust bakes for a 15 min, remove the foil and weights then place pie shell back in the oven to cook for 10 more minutes. Remove crust from oven when it just starts to brown.

    No pie weights, no problem. Lots of cookware is made from copper, so why no pie weights?.
  2. Whisk cream, vanilla, eggs and yolks and set aside. While your crust is baking, make the filling. Combine the pumpkin, yams, sugar, maple syrup, ginger, nutmeg, cinnamon and salt in a pot. Heat it until it gets to a sputtering simmer. Continue to let it simmer for 5 to 10 minutes. Mash it with a potato masher (or a fork). Stir constantly for another 5-10 minutes.
    Pumpkin, yams (aka sweet potatoes), sugar, syrup, spices.
    Keep stirring until it's done. It will get all creamy, sticky and thick.

  3. Remove from heat and let mixture cool for 5 minutes. Then add the cream mixture and whisk together.
    Let it cool before you add the cream and egg mixture. You don't want eggs to scramble.
    Whisk together cream mixture and pumpkin mixture.

  4. Strain mixture thru a fine mesh strainer. Use a rubber spatula to push solids through to make a smooth, creaming liquid. When all the solids thru you can, give it one more stir then pour into the pie shell.

    Mr. Potato head helped me strain the solids thru a sieve.
  5. Pour into the warm pie crust. Place in the hot oven (400 degrees) and bake for 10 minutes. Turn the oven down to 300 degrees and finish baking for 25 to 30 more minutes. When the center is set (or the instant thermometer reads 175 degrees), remove from oven and let cool at room temperature for 2-3 hours until custard set.
Nearly perfect pumpkin pie -- just put a dollop of whipped cream on that little hickey.

Tah-dah … And there you have a pumpkin pie that tastes good even though it’s not perfect.

Buttermilk Pie

Buttermilk pie is a real winner at any function. It’s old-fashioned goodness. And it’s so easy and non-fussy, I’m almost ashamed to share the recipe, (almost, but not quite). This is easy to double too, then you can take two yummy pies to grandma’s for Thanksgiving. This is another recipe that is hard to mess up and very novice-baker friendly.

A buttermilk pie in all its glory!

Ingredients:

2 C. Sugar

½ C. Butter (one stick)

2 tbs Flour

1 C. Buttermilk

3 Eggs, beaten

1 tsp Vanilla

(One pie crust in a 9 inch pie pan/plate.)

Mix sugar and flour then beat in the butter.

Add the buttermilk …

then the eggs and vanilla and stir it all together.

Get out your wonderfully prepared pie crust (see Never Fail Pie Crust). If you’re in a bind, the refrigerated pie dough will work fine. Pillsbury is my favorite brand. Pour the sugary goodness in.

Bake at 350 degrees for about 1 hour or until your pie is GBD (Golden Brown Delicious).

This is actually a pumpkin pie, but the image makes me laugh with Elvis Parsley and Days of our Chives standing guard over the baking pie.

Never Fail Pie Crust

Literally a page from my grandmother's cookbook.

In 1975 my grandmother published a cookbook titled Food for Body and Soul. In it are some wonderful recipes that are passed down for generations. (more about my grandmother’s cookbook in another post).

The Never Fail Pie Crust is one of those great recipes. This crust is easy to handle and doesn’t require a lot of precision, like most baking does. It’s always soft, yet flaky. Because this recipe uses shortening instead of butter, it comes together very easily. It’s Never Fail, because anyone can pull this off, regardless if you’ve developed a “feel” for the dough.

Pretty standard pantry ingredients for a pie crust.

Ingredients:

3 C. All-purpose flour

1 tsp salt (use table salt)

1 ¼ C. shortening

1 egg, well beaten

1 tbs vinegar

5 tbs water

All in.

Put them all into the food processor, and let it rip.

[If you don’t have a food processor, cut in the flour and shortening. Then add the wet ingredients.]

When it comes together in clumps, it’s ready.

Pretty much flour and lard.

Pull the dough out and shape into a ball. Cover with plastic wrap and refrigerate while you make your pie filling. This dough doesn’t need to be chilled necessarily, but it is easier to work with when it’s cold/cool.

Hanging out in the fridge, waiting its turn.

When you are ready for it, roll out dough on a lightly floured surface. This recipe makes enough for a double-crust, deep-dish pie or two single-crust pies. This can be rerolled without toughing and it keeps in the refrigerator for up to two weeks.

A beautiful pie crust.

Happy Pies, Y’all.


(buttermilk pie recipe coming next.)