Trav’s Corner: Pork Loin Roulade Stuffed w/Crawfish in a Cajun Butter Sauce

Our South Texas chef buddy, Trav, checks in with another great recipe. For more info on Trav’s culinary offerings, services and contact info, visit his Facebook page.

1 pork loin section

8 oz crawfish tails

1 red bell pepper, diced

1 onion, chopped

Chopped parsley

Celery seed

Old Bay

White wine


First, make the filling. Drain the crawfish tails and sauté with the onion and bell pepper in a little olive oil. Season with Old Bay and celery seed. When the onion is translucent, deglaze with a little white wine, squeeze in a little lemon juice and reduce til the liquid is almost gone. Remove from heat, toss in the parsley and set aside.


Next, make a roulade with the pork loin. Using a long, sharp knife, start cutting the loin the loin about an inch from the bottom, like so:


Continue cutting, turning as you get to the sides, maintaining a constant thickness until you have a flat sheet.


Season the meat with salt and pepper, then spread the crawfish filling on the loin.


Roll up the loin and tie with butcher’s twine.


Season with Tony’s, the roast in a 375 degree oven until a thermometer inserted to the middle reads 160 (about 30-45 mins). While it is cooking, make the sauce:

White wine

Lemon

Shallots, minced

Chicken broth

Cream

Diced tomato

Paprika

cayenne

1 stick of butter, room temp, cut into pats

In a small sauté pan, boil the shallots in half and half mix of white wine and lemon. Reduce to a glaze, and then add a little chicken broth, three times as much cream and the paprika, cayenne and tomato. Reduce to a sauce like consistency, and then strain. Whisk the butter into the hot sauce, one pat at a time, until completely incorporated. Keep the sauce warm, but not hot. If it gets too hot, the butter will melt and the sauce will break.

When the loin is done, slice, plate, and pour the sauce over the top. Serve immediately.


Badass Buffalo Wings

If you’ve spent anytime in a sports bar and/or Hooters, then you’ve been exposed to the chicken wing. Some approach chicken wings like a necessary evil in order to go to crappy restaurants with big boobed waitresses, but I love chicken wings. The texture of the meat and the amount of sauce-to-meat ratio is until any other piece of chicken, especially if you know how to eat one correctly. However, the average home chef tends to avoid cooking chicken wings at home because it’s so much quicker to go pick some up on the way home from work. If you give yourself some time to learn the correct way to cook them, you’ll realize how easy they really are. I think the biggest issue people have is a) how to prepare the sauce and b) how to cook the wings themselves.

I like my wings baked. Wings have a ton of connective tissue in them, and if you cook them too quickly then you’ll have wings that are kinda hard to eat because the meat has a lot of sinewy parts holding it all together. This is by design…the bones of a chicken are very thin and easy to snap, however they don’t fly. This means that the wings are nice and meaty so you can eat them. Without any hesitation, I’d tell you that the wing is my favorite part of the chicken to eat, and the best way to cook it is buffalo style.

Tools

Butcher’s knife/cleaver, sharpen and put to steel
Cutting board
Shallow cookie sheet lined with aluminum foil, shiny side up
Oven preheated to 425deg

Prep

When you buy wings, you should plan on 14 pieces per hungry adult heterosexual male. That’s going to be 7 full wings, and you can count them inside the package when you buy them. We are looking for WINGS…not drummettes or wings that are already cut. We’ll do the heavy lifting here, so buck up.

When you get your wings home, make sure they are defrosted. For some reason, butchers are starting to keep these things in the freezer frozen. Take them out of the package and wash them down with water just to rinse off the slimey shit.

REMEMBER – Mishandling chicken can kill your ass, so you need to wash your hands before and after dealing with chicken, including any other kitchen tools you touch as well.

This is what we are looking at:

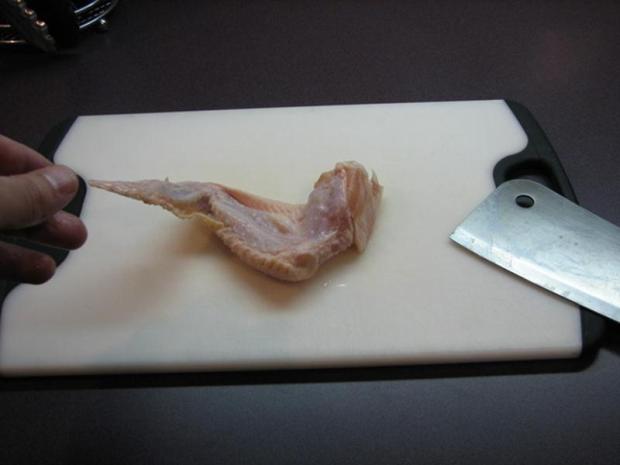
There are three parts to the wing: The “tip”, which is akin to a hand, the “flap” or the “flat” (I’ve heard it both ways) which is the middle section, then the drum. If you lay the wing skin side down, you can spread the wing out and get a good working surface.

If you feel the joint where the tip meets the flap, you’ll feel a little ball. Put your knife right on top of that ball, put the tip of the blade down on the cutting board and your free hand on the top of the blade to steady it and cut down in a sharp snap. This will cut thru skin and bone at the same time, leaving a nice clean cut. Then, take the wing and set it upright on the tip of the joint so both remaining parts stick up into the air in a V shape. If you spread the wing out, you can see that there is a piece of skin connecting the two parts. The joint is a ball joint, so we can easily sever the two parts by cutting directly down into the V of the joint and working the knife around the ball joint to cut all the way thru.

Admittedly, this is a hard thing to explain and probably harder to understand just by reading. So, click this link and you can watch a video of it.

As you chop the wings, align them on your pan skin side UP. I like to align mine by either flap or drum. It will make sense why later.

Season with garlic salt and pepper, but not too much. Flip them over (skin side down now) and do the other side.

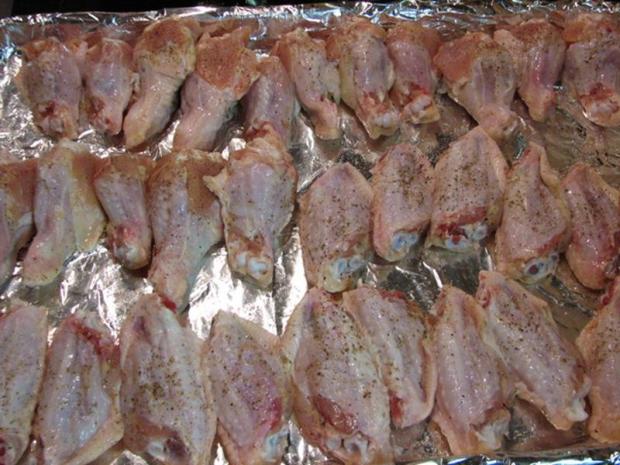
Pop them in the oven for 20 minutes.

Sauce

Buffalo-style sauce is relatively easy, but it’s all up to you on how you want it to taste. Start with five tbls unsalted butter, melted. Do not let it get to hot or it will separate and make a mess. Then add 1/2c of Frank’s Red Hot sauce.

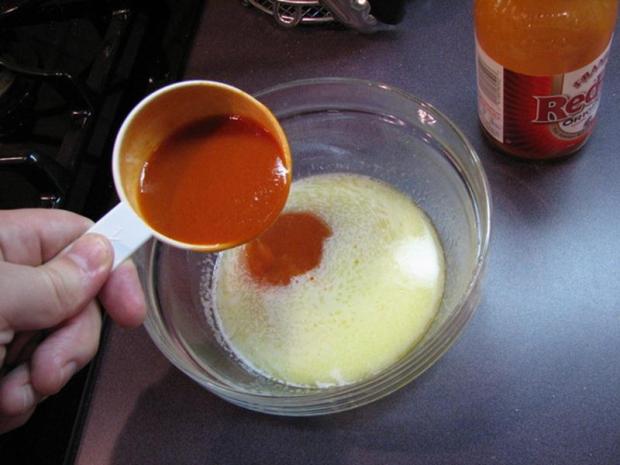
Whisk it in. Now, I like to put a lot of shit in mine to flavor the sauce. All this does is make it spicier and/or hotter, so at any time feel free to stop.

Let’s add 1/2tbls of garlic chili sauce:

And a few squirts of sriracha sauce (chili sauce):

And since this is so acidic, lets throw in a sprinkle of sugar to cut it and some soy sauce for salt. For extra heat, I add just a bit of this bad mother fugger:

Taste it along the way. You’ll want to put it in the middle of your tongue when you are testing it to get the full flavor.

After 20 minutes, flip the wings and cook them another 30 minutes. Watch them…you are looking for crispy but not burned or dried out. After 30 minutes you can put them under the broiler for a couple of minutes to really crisp them up, but be careful because they will burn very quickly.

If you let them sit out for a couple of minutes, they are easier to pull off the pan w/o tearing the skin. Give them a jiggle if they stick to let the fat work its way under the wing.

Put some sauce into a large bowl and add a few wings at a time. Toss, add more wings and sauce and repeat until you are done. I like to do equal parts drum to flap when I toss them. The sauce should be room temperature and the butter solids may begin to solidify. That’s ok…when the wings are added, it will heat up the sauce and melt it down perfectly. You just want the sauce to be kinda runny so it coats the wings good.

Plate them up and serve with blue cheese and/or ranch for dipping. I’m a big fan of fries with wings as well as all the beer I need to wash down the heat.

Homebrewing Beer 101: The Finale

For the past two months, almost two cases of beer were in my front hall closet going thru a process of fermentation, carbonation, and conditioning. If you’ve followed along with us so far, then you’ve seen the background of how we got to this point and why. You might have even seen the second batch we bottled.  Weeks of waiting and holding and damn near torture and we’ve arrived at Judgement Day…we’re going to uncork.

This beer is a clone of Tire Biter Bitter Ale. We used a blonde malt…

And steeped hops for 90 minutes:

This creates a “wort”. The wort is the beer before it starts beerifying itself. We left the beer in a primary fermenter for a month. NOW…we should have pulled this after the first 7 days and then moved into a secondary fermenter, but we didn’t. Also, we realized when we went to bottle that we left out a couple pounds of sugar on the recipe, so we added it posto facto. It couldn’t be that great of an idea, but it worked out pretty good, all things considered. The wort went for a second fermentation with the added sugar. Then we pulled it, bottled it, and let it sit for 3.5 weeks to condition perfectly.

And here we are.

We keep a stocked kegerator that has a freezer on top, perfect for keeping frosty mugs and p’s for the beer. Four friends, four frosty pubbers, four bottles of beer.

Let’s do this…

The immediate pop is a HUGE relief to us. You never know if the carbonation is going to really take place. As long as the sugars stay fermenting and the cap stays airtight, then we should be good on bubbles. If not…well, let’s not discuss the ‘if nots’ right now.

The pour is perfect…lots of air, lots of foam. Good head forms on the top of the golden elixir and tiny bubbles work their way up thru the now completed beer.

Tasting notes: I’ll admit…I expected this to kinda suck. The homebrews I’ve had in the past have sucked harder than anyone has ever sucked before. This got off on the right foot in the glass. It looked like beer. It smelled like beer. And by gawd, it TASTED LIKE BEER. And not just homemade beer…this tasted DAMN GOOD. Tons of hoppy flavor and bite, a very citrusy finish that didn’t linger as much as the hops. We didn’t take measurements on this one, but from the buzz we got right afterwards, we are guessing that the abv is quite high.

This was a really good beer. Not to brag, but we KILLED it the first time out. We all sat in awe of the process and the work we did, still not really sure if one or all but one of us got together and filled the glasses with real beer as a joke on one person. It was a very good beer, to the point that I’d take it over most commercially made beers. The body was deep; lots of character to it. The bubbles made a perfect head with creamy froth for your lips.

We call this one “Made In Voyage”.  It’s a play on words from “maiden voyage”, or our first time thru the process.  But mainly because we changed things up from the original recipe as we went, so we were literally making this in the voyage and making it up as we went.  We are still learning the rules, but so far our little maverick ways have paid off.

And after all this time, all it took was a little homebrew. I’m hooked. Can’t wait to get right back in and try another batch.

Homebrewing Beer 101: Editor’s Note – Big Jim’s Double Dark

As a quick aside from our beer chronicles, we went ahead and purchased the ingredients for a Double Bock (or a “Doppel Bock” as the purist say) the last time we were in the brewstore. This is made with DARK malts and dark roasted grains. The recipe is meant to be a clone of the delicious Paulaner Salvator Doppel. I’ll add more pictures down the road at some point, but this actually is worth a quick post just to tell the story of our first ‘big’ beer. We wanted one that would be ready in a couple months and a fun one. This one takes 6 months to finish off. That sounds long to the novice, but the masters will brew then cask in bourbon oak casks for a year at a time to mellow their wort.

We’re not waiting that long, at least not at first when we are still learning how to do this. Here’s the fun part, though….when we were bottling the bitter ale, we realized that we LEFT THE SUGAR OUT OF THE DOUBLE BOCK. That’s an issue. Without enough sugar, the yeasts can create enough alcohol and the flavor will be really weak. After some deliberation and a commercial beer or two, we decided to go ahead and mix in the sugar AFTER the initial fermentation to restart the yeasts for another fermentation before we bottled. The process would last 3days to a week until the sugar was devoured.

Now…was this a smart idea? Probably not. The risk of picking up mold spores or dust or anything bad in the transfer is really not something we want to do. However, spending 6 months on a beer that ends up tasting like something they sell in Oklahoma where they limit the beer abv to 3.9% is not something we’d rather do. So we mixed up the sugar with some of the wort we siphoned out of the carboy then funneled it back in. After a full week, the bubbles stopped and the beer was ready to bottle. We left it in an extra week. Why? Well, we were busy. That’s probably not that smart either, but hey…we are new to this.

Bottles, disinfected and dried

The glass carboy with the delicious double bock waiting inside. Notice the ring of yeast around the top. That’s where the wort was when we first put it in. The yeast ate it down that far.

The color is like cappuccino. Dark brown with a foamy crema on top.

I’m fast forwarding a bit, but this is what the carboy looks like after it’s drained. The bottom looks like saturated river bottom sand. Doesn’t smell like it, though…this smells like warm yeasty bread with a PUNGENT alcohol punch to it. Smells incredible.

This is the brew in the secondary fermenter that we are using for bottling b/c it’s the only bucket we have with a spigot. Forgive me for the heaven photo effect, but it’s the only one I could find that highlighted the brew and the crema without picking up any other colors. The texture is similar to a dark soy sauce. It’s a sweet flavor that’s definitely young and needs some time in the bottle. In a pinch, though, you could drink this right now. It would need to be in a pinch, though, because this needs some bottle lovin’ for a few months.

We used a couple oversized bottles that Runnin’ Buddy has been saving for a few years in case he ever picked up homebrewing. It’s almost destiny.

Some random shots of the bottles, filled with the sweet nectar of the double bock.

And there we have it…forty bottles of our double bock that we lovingly named Big Jim’s Double Dark. Check back in August when we get to open these.

Homebrewing Beer 101: Tire Biter Bitter Ale Part 2

If you remember the last time we met here, we were in stage one of our new project: homebrewing. It’s the essence of true Arcadia. Anyone crazy enough to move out to the country needs to pacify themselves somehow.

The last time we were here, we just finished up the wort for a bitter ale called “Tire Biter”, made with blonde malt syrup and blonde malt grains, seeped in a tea for a while, then all mixed together for an hour with noble hops, and then we cooled it off in our primary fermenter, primed the airlock with vodka and slid it into the hallway closet for the magical yeast to take it’s time to do what it do, baby. Next step: Bottling.

We always start with a little bit of hot water and some bleach. Not too much…just enough to kill stuff. Now, since this is our first time thru the beer making process, we were told to used diluted bleach. Since that time, we’ve met up with a couple different homebrew supply stores who think we are batshit crazy for using bleach. There’s some other stuff we are supposed to be using, so we’ll get some the next time we’re in. For now, it’s bleach.

All parts go in to the bleach soak:

We’ve got two cases of bottles washed and disinfected in the dishwasher. We’ve got a disinfecting cycle on our Bosch diswasher. Pretty damn handy for kids or beer.

The only ingredient we are using today is corn sugar. 3/4c is all we need to prime, which means we are going to add it to the wort to make the fizzy bubbles in the beer.

First thing, we have to take off the top of the primary bucket and prime the wort. I mixed up ¾c of corn sugar with enough water to make a pint. Then, I left it out for a bit to come up to room temp and swirled it into the wort, being careful not to upset the yeast on the side and bottom of the bucket.

Now, before we go any farther, let’s take a look at the wort so far:

I ran a little thru the bottle filler hose to flush out anything left from the rinsing stage. Gorgeous color, and the smell is divine. The yeast looks absolutely dreadful, but it smells like warm bread dough. We debated on uses for the left over gunk, but could only come up with “potential sourdough starter”.  In the end, we just washed it down the drain.

Gravity says we have to siphon from up above to down below, so we put the bucket up on the counter, attach the bottle filler, and open the valve. Since the top is open, we don’t have a problem with creating a vacuum.

The bottle filler is designed to go all the way to the bottom of the bottle and trigger to release the flow of beer into the bottles. When it gets to the top (maybe even overflowed a bit), then you pull it out and it’s ready to be capped. The extra space in the bottle helps age the beer, which it needs an additional 3 weeks still after this bottling to mellow the flavor and create the bubbles. The bubbles are made from the leftover yeast and the sugar we added to prime.  The yeast eats the sugar (which calms the flavor), and yeast expunges CO2 as its “waste” product.  That’s right, kids…beer is bubbled with yeast poop.

Our bottles are mottled this time around. We went heavy on the EZ-Cap style. I think we’ve decided to go with the EZ-Caps as much as possible in the future, but we also have about 50-60 regular bottles that require a metal cap. Since we are just starting out, we are just going to do both and see which one we like best.

With the bucket up on the counter and bottles in place, we are ready to go.

Top view before we start. The color is like a light orange honey.

This is about halfway thru with the bottling, but I wanted to show these two up next to each other for effect.

And of course, the bottom of the barrel

The bottom still sorta churns itself as the yeast are still somewhat active.

If you’ve ever had a bottle of Fischer’s Alsatian style beer or a Grolsch, then you know how easy the EZ-Caps are to open. They are just as easy to put on as they are to take off. When we ran out of EZ-caps we went to the old standard beer bottles and our analog bottlecapper.

We had some old unused bottlecaps that came from an old Sunkist bottling plant. We don’t give a shit what the caps say. All we care about is the beer. As long as they work, that’s all we care about. Plus, it will be a good conversation starter.

Another shot at the wort…maybe it is Sunkist afterall.

And when they are all finished, they go back into the hallway closet at 60deg F for another 3-4 weeks for bottle aging. We are a month away. Can’t wait.

Finale coming up shortly…

Spring Critters in Photos

The birds of Spring have been here for about a month. I’m not a serious birdwatcher but I always have bird feeders out year round so I can watch them. I love birds in the wild but hate birds in cages. The bird society and pecking order among the different species is fascinating.

Our backyard has been abuzz with the activity of Spring. And occasionally you have a sweet surprise among the critters of Spring.

House sparrow


Carolina chickadee


Downy woodpecker


Grass lizard


Spring is Here

Spring is here in North Central Texas. It is obvious in all the sprouting and flowering plants.

Icelandic Poppy
Daffodil
Ornamental Pear

The winter wheat practically glows in the sun. The daffodils are a bloom and the perennials are starting to come back to life. But I happen to have a greenhouse so I’ve got a bit of a jump on things.

Today it was 78 degrees. It’s February 28. I don’t know what that is going to mean but I don’t think it bodes well for the garden season this year. We’ll see.

But for now I’m happy with what I got going on in my little garden.

View into the greenhouse to the left.
View into the greenhouse to the right.
The herb project.
Someone spilled some of my seeds ... I'm not saying who (Jdubs) but I didn't want to throw them out so I just stuck them in a pot to see what sprouted. I have no idea what this is, maybe tomatoes or peppers
A little tomato is forming. And considering how warm it's been, early season is best.
More tomatoes ... these are Celebrity.

My Dog, Ruby

Ruby is a great dog; she’s my dog. I got Ruby in January of 2005 as a little puppy. At the time in my life I needed a companion and a loyal friend.

She is a loving, obnoxious canine with OCD. An Australian Shepherd, she is a working dog, and loves to play ball. I’ve never seen a dog play fetch like this dog. This is a photo blog of Roobs.

The ball.
Next to my bed.
Getting to go on the feed wagon.
A good shake after a Christmas Bath.
Jack and Ruby on the feed wagon together.
Ruby and Jack on a beautiful day.
Ruby wanting to come in.
Her other favorite pastime -- chewing her bone.
Photo bomb -- Ruby is also a garbage/begger dog.
Always my companion.

Giggle Trigger

Today the husband and I drove to the big city of Whisky-Tango Falls [aka Wichita Falls] to run a few errands. We went to a local housewares store in search of door hardware. And while a sales person was showing us door handles, something triggered his giggle-snort. He lost it and had to leave the store to compose himself. Ten minutes later, when he returned with his giggle under control, all it took was for our eyes to meet and then it was all over again.

I can’t go into specifics, but the giggling was simultaneously inappropriate and uncontrollable. Even 12 hours later when he thinks about the situation, he falls apart.

This could have been my husband today: