1 cup Hatch chiles, roasted, peeled, seeded & diced
¾ cup chopped onion
3 cloves garlic, minced
3 roma tomatoes, diced
1 large avocado, diced
½ cup chopped cilantro
Juice of 1 lime
2 cups half & half
1 cup chicken broth
In a large saucepan, sauté the onion in some olive oil & butter until soft and translucent. Add the chiles and garlic and sauté briefly. Do not allow the garlic to brown. Add the chicken broth and bring to a rolling boil for two minutes. Add the half & half, lime juice, tomato, avocado, and ½ the cilantro. Bring to a simmer for 30 minutes. Put into bowls and serve with a sprinkle of cilantro and a twist of lime.
When I was a kid, one of the greatest joys in life was the random family “get-together”. It could be a family reunion, a holiday, or just a random gathering of our clan of peeps. The best part of these gatherings was the food…OH THE FOOD…that would come out of the families who were from all over North/East Texas. I’ve joked often that I’m pedigree White Trash, but this might be the cherry on the top of the sundae, so to speak. I don’t even remember when this particular dish showed up the first time, but after it did it became a staple in our get-togetherin’. I distinctly remember heated conversations over whose favorite dessert this was as various family members tried to claim that it was their favorite over some other family member.
The original incarnation of this dish was made with peaches and was simply called “Peach Stuff”, and as far as I know has remained so in the family up until this point. I’ve often wondered outloud if this thing would be good with just about any different fruit you throw into it. However, your available ingredients will limit the type of fruit you use. I’m getting ahead of myself…let’s get this thing built and then go back and reassess.
Ingredients:
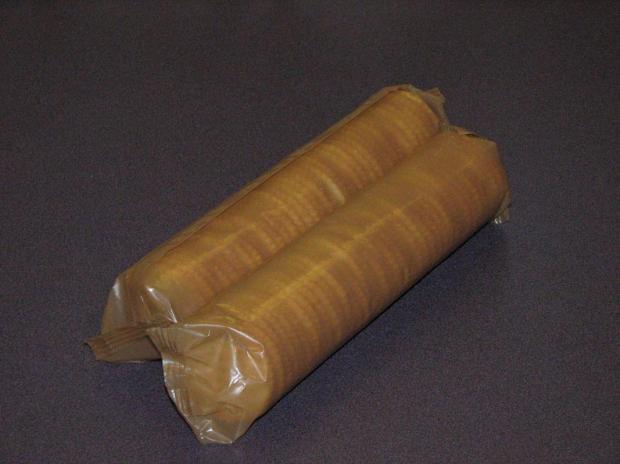
-Two tubes of Ritz crackers
-a stick and a half of unsalted butter (real butter…don’t you DARE use margarine)
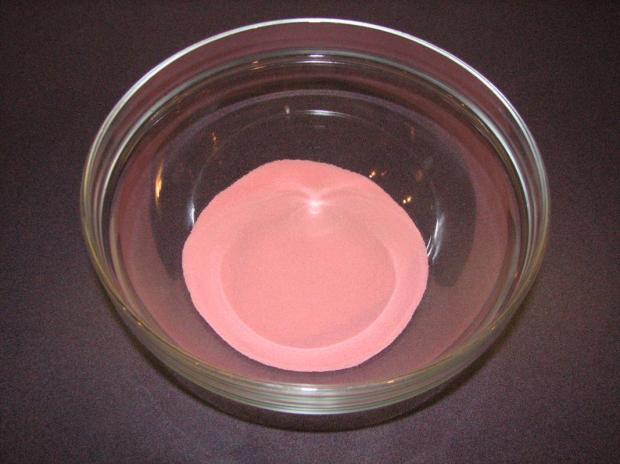
-a large pack of strawberry jello (or two small packs)
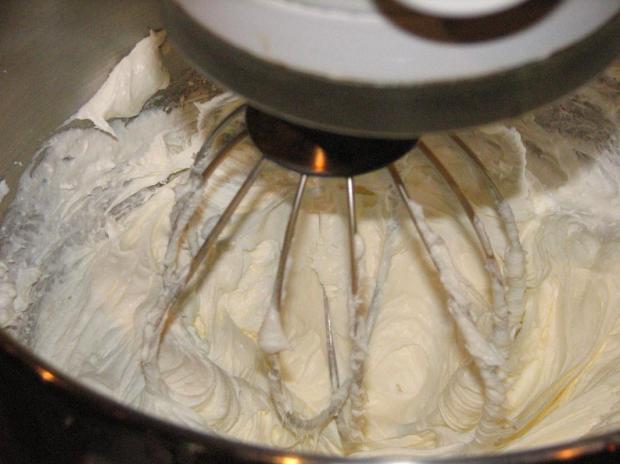
-a tub of Cool Whip (full strength…not the lite crap)
-a stick of Philly cream cheese (full strength…no the lite crap)
-a cup of sugar
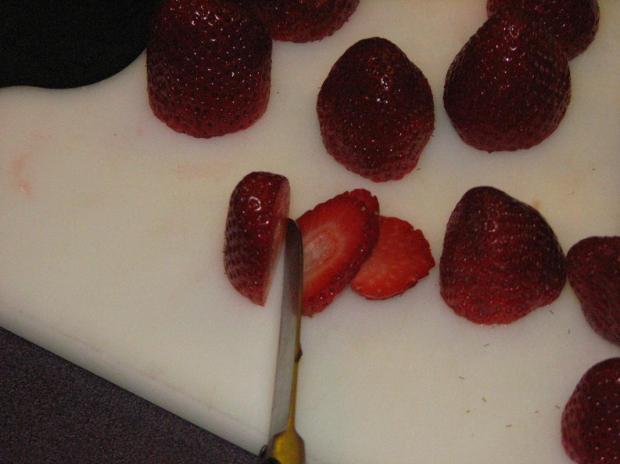
-2lbs of fresh strawberries
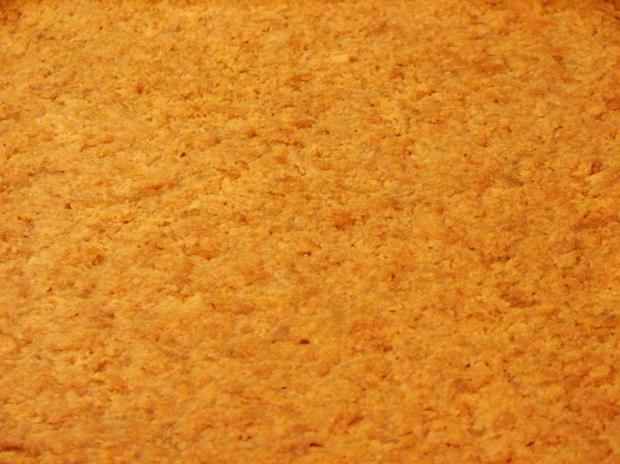
Take the two tubes of Ritz and crush them GENTLY so that you don’t bust open the packages. Trust me..it’s easier to do this inside the package. I tried using a food processor on it one time, but it made the crumbs too small. You want a varied sized crumble on this.
By rolling the crackers inside, you can crush them with your thumbs. Just make sure you don’t leave any big chucks. Even if you do, though, you can crunch them in just a bit.
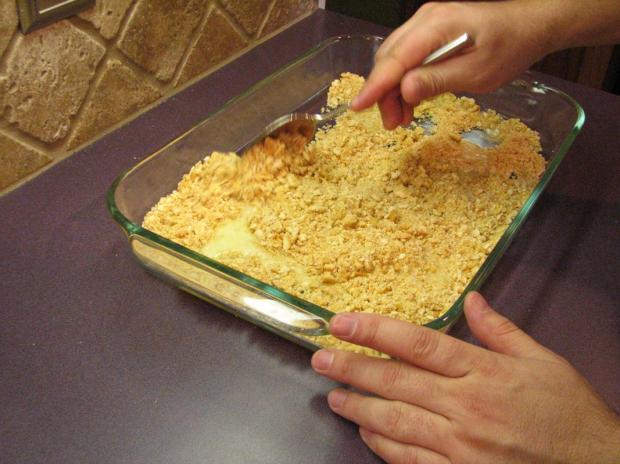
In a 13×9 ungreased pan, dump your crumbs out.
You can see some of the bigger crumbs here…just squeeze them with your fingers to smash them.
Melt the butter (just so that it’s soft…don’t get it too hot or it will separate).
Pour the butter into the crumbs.
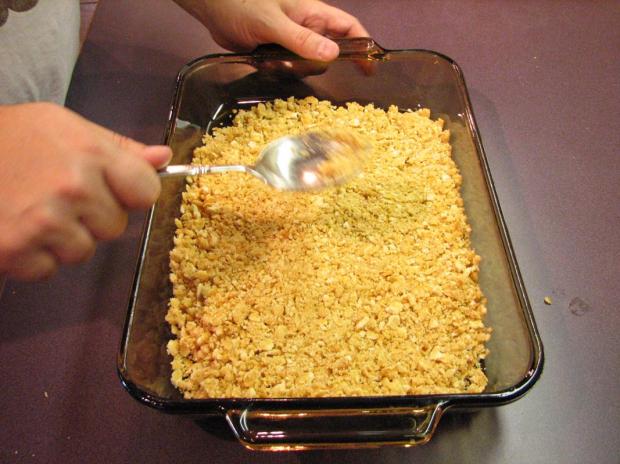
With a big metal spoon, mix the crumbs and butter together so that it’s evenly spread.
Turn the spoon over and start whacking the crumbs so that they even out all over the pan (you’ll notice the pan is suddenly a different color…I grabbed the bigger one on accident when I started out and had to change). Don’t whack too hard. You can use the weight of the spoon if your spoon is big enough. Smacking it will pack the crumbs in. It will take you a good 10min to do this, probably. You want the edges especially to be sealed up around the corners. Again, in just a bit this will make sense.
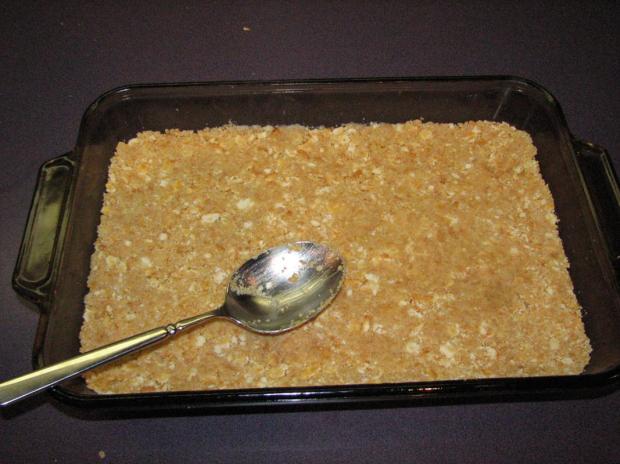
It should look something a-like so:
Packed in good.
In a preheated oven, put this on the middle rack and cook for 20-25 min @ 350deg. It may take a bit longer, but that should be about right. You are looking for it to be nice and golden brown.
In the meantime, prepare the Jello as per the instructions on the package.
Once you get it made, slip it in the fridge for 20 min, then into the freezer. We want it to get to where it’s JUST starting to set up, but not too set up.
Now then…let’s make the good part. Dump the Cool Whip, cream cheese, and sugar into your mixer and start whipping it up. It helps to leave the cream cheese and Cool Whip out for an hour or so to soften. Whip it on high. The sugar needs to be dissolved completely, and the mixture can use the extra fluff.
When it’s good and whipped, it will look almost like Crisco. Appetizing.
And you get to pick who gets to lick the beater.
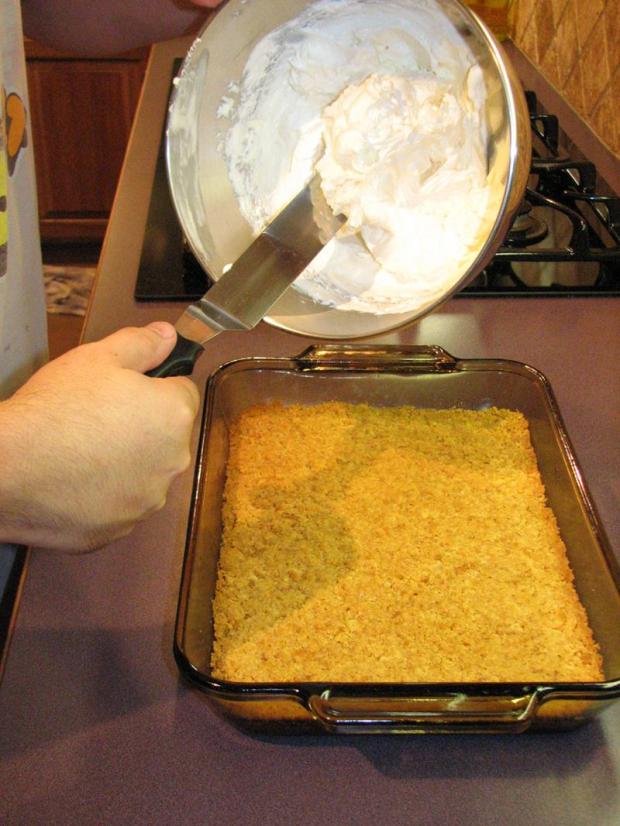
Pull your crust out and let it cool. Don’t try to put the cream cheese mixture on when it’s still hot or it will be a mess.
A close-up of the crust. You’ll be amazed at how good this will make your house smell.
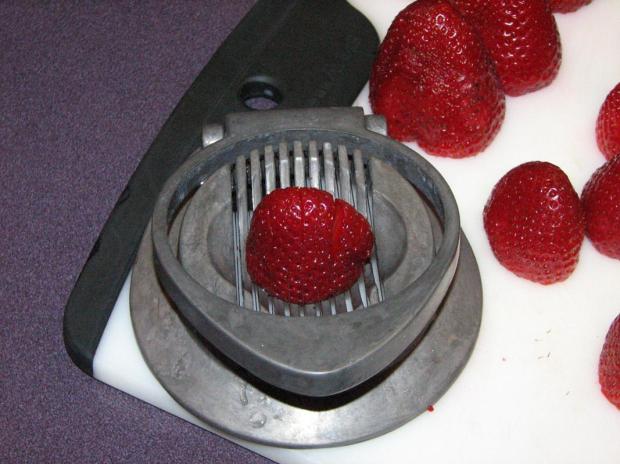
Top the strawberries and slice them up. They need to be in pretty thin slices, which you can accomplish with either a knife:
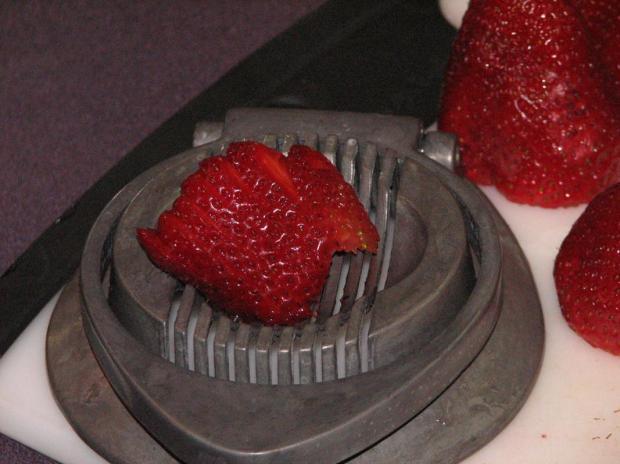
Or an egg slicer, which will cut your work down by a ton. This is one of my favorite tools in the kitchen. I use it for eggs, mushrooms, and strawberries when I want them sliced. You have to go easy at first or you’ll smoosh the strawberries. Just go easy so you don’t end up with a mush.
I thought about macerating these with sugar, but that will drain them of water and you don’t want that. When they are sliced up, put them back in the fridge to keep them cold until your crumbs are cool and your Jello is ready to use.
When the crumbs are cool, dump the cream cheese on them and spread them out. Go EASY with this or you’ll f up your crumbs. You need them to be sealed off completely by the cream cheese, and if you push too hard you’ll move the crumbs. Bad. Just go easy.
Speaking of the Jello, by this point it should be ready to go. This is borderline too far…when it starts getting thick, pull it.
Spread the cream cheese and make the edges TIGHT. It needs to seal up the crumbs. Using a paper towel, clean up the sides. It doesn’t have to be too clean, but you’ll want a separate layer look for presentation. If that doesn’t matter to you, then don’t worry about it.
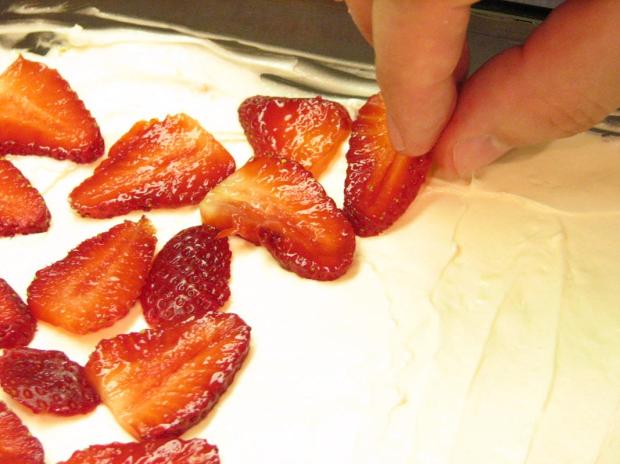
Arrange the first layer of strawberries evenly on the cream cheese.
Once you have the bottom layer covered, then take the rest and even spread them out. You put the first layer down one-by-one so you know that you get good coverage of the white stuff.
\\
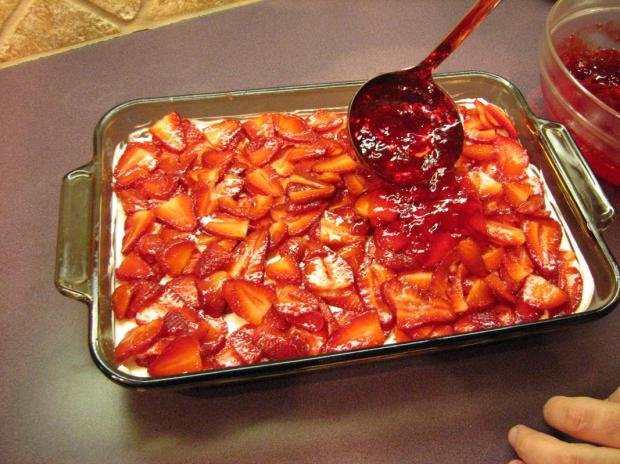
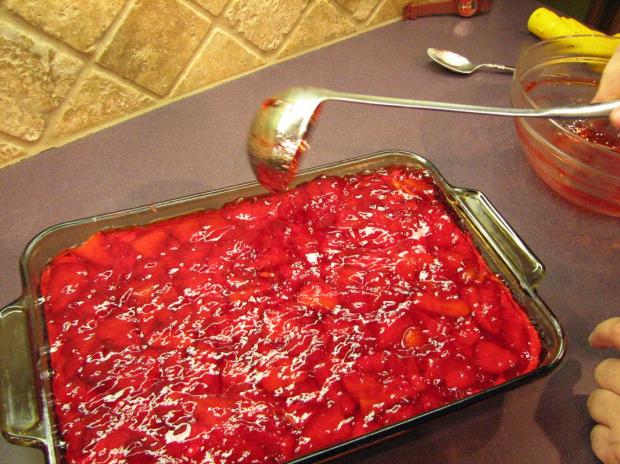
With a ladle, carefully pour the Jello onto the strawberries. Go easy now…if you pour to fast or heavy, it will penetrate the crumb layer and make ’em soggy. Bad.
Pour it over evenly.
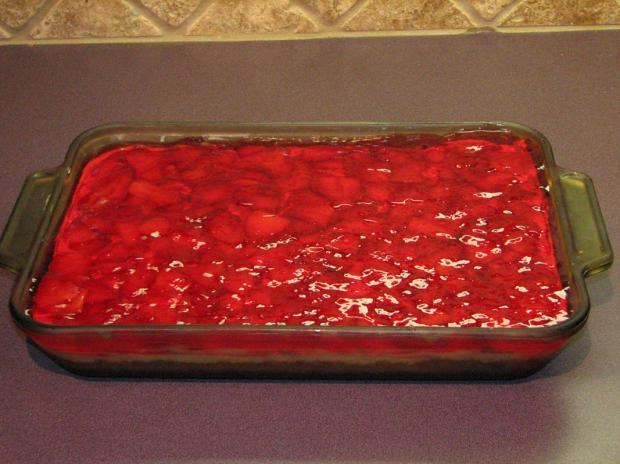
From the side, you can see the layers. Now then…how white trash is this thing? Ritz crackers, whipped cream, cream cheese, and Jello with fruit in it sounds like every recipe out of the local Baptist church cookbook, doesn’t it? I’m sure that’s where this thing came from. Doesn’t matter, though…we are 12 hours away from greatness.
Cover the pan and put it into the fridge overnight. The Jello needs a few hours to set up completely. Don’t pull it early. When you do, though, this is what you are treated to. Oh, man.
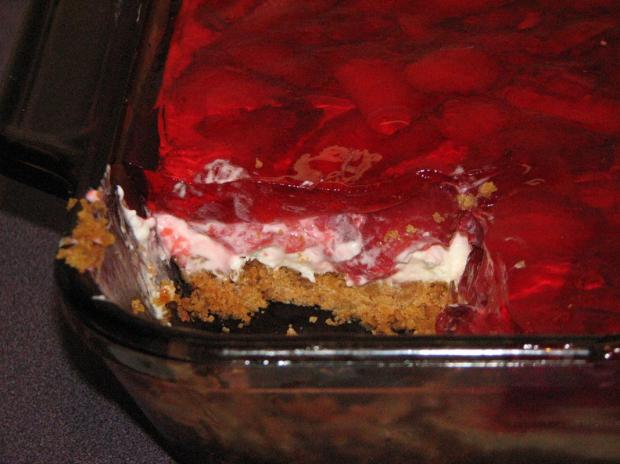
The first slice is always the hardest to get out, but when you do get it out you’ve got this crispy, crunchy crust, creamy sweet layer of goodness, then the tart and crisp strawberry/Jello layer.
Back to the original conversation…this was Peach Stuff when I was a kid. You use peach Jello instead of strawberry, and use canned peaches instead of strawberries. You can chill the cans of peaches and drain them, using the juice as the “cold water” on the instructions on the package. I’m sure you can use just about any fruit flavor that Jello makes outside of lemon or lime. Whatever fruit you choose, though, this will be a instant favorite at your family get-togethers or holidays.
There’s a part of me…a rather LARGE part of me…that loves a nice cold glass of liquor. The best alcoholics choose vodka as their boisson de choix, and who am I to argue with the experts?
There’s nothing like an ice-cold martini. Some prefer the Xmas tree lingering taste of gin, some like a little bit of vermouth; it all depends on the mood and most importantly depends on the drinker. That being said, there’s an equal if not greater part of me that’s North Texas white trash pedigree with a palatte for food that is hard to describe to most normal humans. We like our taco burgers, our Pittsburg Hot Links, and our pickled eggs. You put the two together and you have this incredibly dynamic mix of either delicious cocktail greatness or just a country washboard glass of goodness.
Up north of the Blackland Prairie where I grew up is the beautiful town of Muenster, Texas. If you want to throwback to the best of anything north of Dallas, you’ll find that this little town has it all. It’s a German town of about 1,500, and these people keep their town as clean as they can. There are two schools, one 2A school and one Catholic school (Sacred Heart ISD). The two schools are literally across the street from each other. Muenster hosts their annual Germanfest celebration, a half-concert/half-food festival in the last week of April every year. We don’t miss it in our family…I think we look forward to it more than we do Christmas. If you get a chance, you should make a day or even a weekend out of Germanfest in Muenster, Texas.
In downtown Muenster, there’s my favorite grocery store on the planet: Fischer’s Meat Market. Not only do they have a great selection of beer, wine, and Affiliated Foods groceries (the gears in any white trash family in north Texas), they have an incredible butcher counter (the back part of the store is also a slaughterhouse where you can take your beef to be dressed out), fresh German bakery items, and an entire row of canned/jarred food items that any north Texan would fall all over him/herself over. You can get apple butter, Hot N Spicy mustard, pecan pie in a jar, or any type of jelly you can think of including jalapeno jelly, muscadine jelly, or peach preserves. Right in the middle of this goodness is one of my favorite things in the world…pickled eggs. And not just any type of regular old pickled chicken egg; they have pickled quail eggs. This is the inspiration to this drink: leaning back on Lake Nocona on the Texas Prairie and sucking one of these down is as close to nirvana as possible (without the heroin).
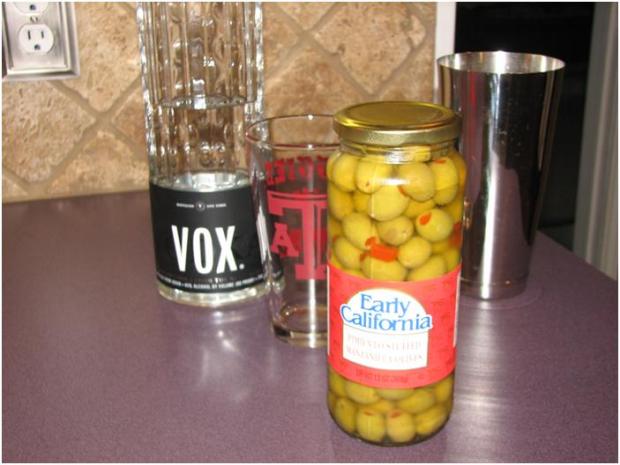
First of all, to make a proper martini, you’ve got to chill the glass. Fill a martini glass with ice and then water and let it sit for a few minutes.
In the meantime, let’s review the ingredients list:
In that Aggie pub glass, we’re gonna throw in a few cubes of ice, three fingers of vodka, and another finger of the olive juice. That’s a pretty dirty martini…you can cut down on the olive juice if you prefer it to be sweeter and less olivey. What is a finger? Hold your finger up to the side of the glass and fill it up to the top of your finger. Then dump it all into the silver shaker, cap with the pub glass and shake three or four times to get it all mixed together. Dump out the ice water in the martini glass and clean out the extra water. Strain the vodka into the glass. If it’s short, pour a bit more vodka into the glass, but don’t worry about stirring…that will come later.
Now comes the fun part. At Central Market, you can find a white cheddar called Isle of Mull. It’s incredibly sharp, but absolutely delicious. Take a bamboo skewer and run a couple of pickled eggs onto it. Then break off a hunk of cheese, and then top it off with a single olive. Break off the extra part of the skewer, but leave just enough to be able to hang onto it. Holding the broken end of the skewer, swirl the cocktail swizzle around in the vodka a couple of times to mix in the extra vodka (if necessary) and then serve with it across the rim of the glass (so the cheese doesn’t fall apart).
Voila…a Texas Prairie Martini, the perfect white trash cocktail and an awesome way to enjoy your cold liquor.
One of the great things about being a food junkie is you get to find other food junkies and learn how to really cook things right. Our S. Texas buddy, Travis, is a REAL foodie; a bona fide professional chef who left the trade for a normal job. We’ve invited him to share some of his favorites from time to time here on AE.
——————————————————————————————
My corner of Arcadia is on the beach at South Padre Island. We’ve got a little place on the bay in Port Isabel with a dock and we keep an underwater light there that comes on at night to attract speckled sea trout. Not only are these fun to catch, but they’re also real good eating. My 7 year old son likes to catch a couple every night. We keep them for trout tacos. Here’s how I do it.
First, you’ve got to filet the fish. Start by laying the fish on the cleaning station with his back towards you.
Lift up the side fin and position your filet knife right next to the fin with the back of the knife at a diagonal towards the head:
Cut straight down to the backbone, and then turn the knife so that it cuts along the backbone.
It’ll be tough at first as you’ll have to cut through some ribs, but after you get through that, it’ll go real easy all the way to the tail. Some people like to leave a piece at the end attached to the tail to make it easier to skin, but I prefer to cut it all the way off. Next you’ll want to remove the ribs. Place your knife right along the rib line and cut down at an angle, following the rib bones.
To get the skin off, lay the filet flat against your cutting surface, skin side down. Holding your knife flat, start at the tail end and cut through a little piece of meat to the skin.
Hold onto this piece with one hand and move the knife back and forth with the other. Let the knife do the work. Don’t try to push the knife along, and don’t pull the skin. This takes practice, but you can just trim off any skin you miss. Now turn the fish over and repeat.
After you wash them off, you’ve got two nice filets. The next step is seasoning. I could put together some bad ass blend, but Tony Chachere already did:
Sprinkle this stuff on liberally, and then the filets go into a hot nonstick pan with canola oil. Cook over high heat until browned and then turn over and do the other side:
Note: searing with Tony’s can result in some pretty caustic fumes. Make sure your vent hood is on (assuming it vents to the outside) or make sure your kitchen is well ventilated. Once the filets are browned on both sides, remove from the pan and place on a paper towel or rack to drain.
While they’re draining, heat a tortilla in a dry pan until warmed through. I like Mission multigrain tortillas with this for health reasons (and cause they’re really good), but you can use corn or flour or whatever.
Once you’ve got all the tortillas warmed up (two filets makes about 6 tacos) you can start assembly. Break off a piece of filet long enough to cover the tortilla lengthwise. Next, spoon on some Greek yogurt:
This is some good stuff, and you can use it like sour cream. Next, squeeze some lime juice on there and start adding toppings. Here’s one with tomato, avocado and sprouts, but you can go with what you like here, including cabbage, peppers, onion, lettuce, cheese, cilantro, etc.
Now sprinkle on your favorite hot sauce and go to town. I usually serve with rice and beans.
Special note: you inland types can sub bass or catfish for the trout. Tilapia will do in a pinch. Just go with white fleshed fish and you should be fine.
I’m a Texan, and any good Texan loves BBQ. However, BBQ can be a tricky. You can’t just throw a slab of meat onto a grill and then slather it with sticky sweet sauce and expect to have good BBQ. BBQ needs LOOOOONG slow cooking with delicious smoke from well-seasoned wood. What that means is that you have to have a piece of meat that has lots of fat, so chicken breasts and backstrap are out. Those boys in Tennessee and South Carolina know this as a BBQ must.
Here in cattle country, we know that brisket is the key to a Texas BBQ. And if you’ve read the Big Red Ribsrecipe, you know that if you are going with ribs they need to be pork ribs and not beef. However, Texans have a really bad habit of overlooking the greatness of the Boston Butt. It could be because it’s pork and not beef; it could be because it’s got a yankee name and the fact that yankees call a shoulder roast a “butt”. Let’s overlook the sins of our sisters from the North and look deeply into what could potentially change everything you’ve known about BBQ and become a staple in your stable.
They call this thing a pulled pork; if you go to a Hard Rock Café, you should find a dish called the Tennessee Pulled Pork or the “TPP” (‘If you’ve been to the HRC and you haven’t had the TPP, you haven’t been to the HRC’). Before they closed the HRC in Dallas, that was one of my favorite things to get. I actually had a kidney stone attack one time eating a TPP, but it’s so good I hung in there for the whole sandwich before heading to the emergency room. True story. On a toasted bun, this might turn into your favorite BBQ sandwich, and again…this is coming from a Texas Beef fan.
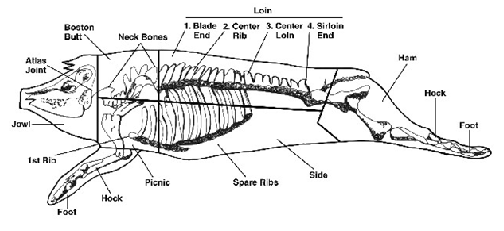
First of all, let’s take another look at our pig diagram:
Right above the ear, you’ll see the words “Boston Butt”. Yeah, it’s the shoulder. They also call this a “blade roast”. Either way, when you go shopping you’ll be looking for the biggest slab of non-ham pork you can find. Note: there’s also a “picnic roast”, which is a nice alternative if you can’t find a shoulder roast. However, the bone isn’t quite as easy to remove for presentation, so stick with the shoulder if you can.
In the package:
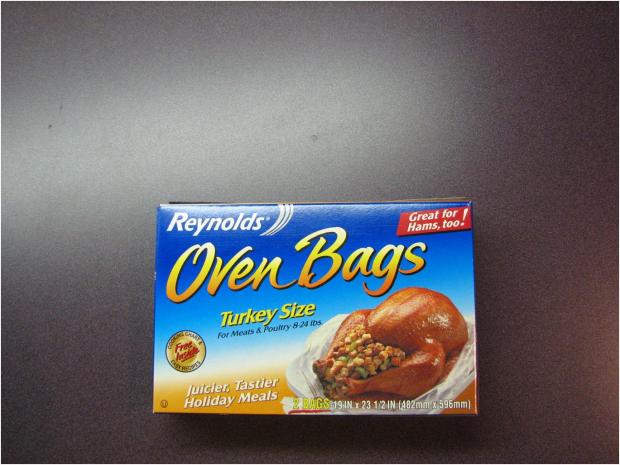
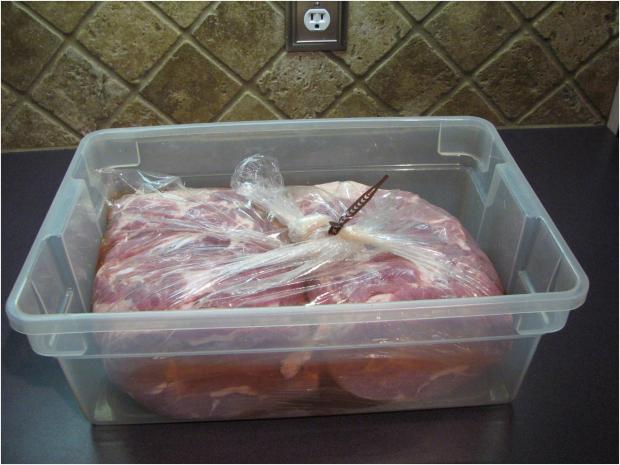
That’s an eight-pounder, which is about the average of what you’ll find. On occasion you’ll run across one a little bigger or smaller, but for the most part that’s what you’ll get when you buy one. First thing’s first….take it out of the package and rinse it under water. Be careful…there are a couple different muscles here, so it may try to fall apart on you. When you get it rinsed off and set aside, let’s get the bag out. I like to use a turkey bag. Reynold’s makes a perfect product for this:
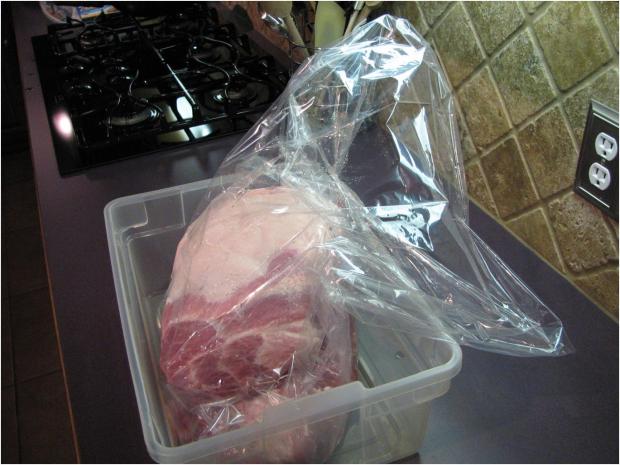
Take the bag and put it into one of those cheap plastic storage bins.
I’m doing two roasts here, but you can double this up easily in the same bag and bucket.
Go ahead and put the roast(s) in the bag. Now, for the next 24 hours, we need to brine this bad boy. Remember…a brine is for moisture, not for flavor. If any flavor is garnered from the brine, it’s a bonus and not the original intent. The brine will be a mix of sugar, salt, and acid to break down those muscle fibers to be as tender and moist as possible. For our brine we are going to use about this much apple juice:
Just pour it right into the bag. No reason to scrimp, but no reason to over do it.
And about this much apple cider vinegar (about a cup):
You can mix them right in together. Swish ’em around a bit, but you don’t have to worry about getting them perfectly mixed. Go ahead and close up the bag and get as much air as you can out. It’s not imperative to get it air tight, but it will keep your fridge from being too vinegared up if you get it closed.
Into the fridge it goes for the night. The next day, take it out of the fridge, unfastened the closure and pour as much of the liquid out as possible. We are going to use a dry rub on this, so you want to make sure you get as much liquid out as possible. No reason to save the brine…it’s done it’s job, and we’ll have ample liquid from the drippings from this after it’s cooked.
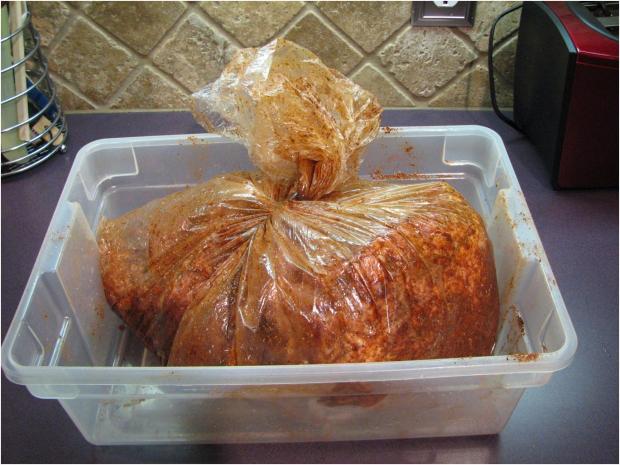
Using the Arcadian BBQ rub, liberally coat these things down on all sides and any cracks and crevices you can find. Then, put it back into the bag and close it back up. It needs another night to get seasoned up.
So that your timing is right, this is your timeline:
Day 1: brine in the evening, in the fridge overnight and into the next evening
Day 2: season with rub, into the fridge overnight
Day 3: smoking for six-ten hours (including the rest)
Fire up your smoker. Now, you guys know how I feel about mesquite. That’s not changing. However, I really like pecan/hickory on this recipe. Because you are cooking for so long, though, you’ll want to use a mixture. Mesquite is a harder wood and will cook hotter and longer than pecan, which is a softer wood. That’s why my nickname in college was “Mesquite”. What’s up, ladies?
Get your smoker rolling to 225-250deg and put your roast on fat side UP. It’s totally up to you on how much smoke you put on it, but you need at least 2 hours of pure unadulterated smoke. Some might argue with me on the fat thing, but if your smoker is designed correctly you’ll have indirect heat, full smoke, and the fat will melt into the meat fibers. That’s important in this dish. You see, it’s different from brisket because on brisket we cut against the grain. However, with TPP we are going to literally pull the pork apart so the meat fibers will be long. Since they are going to be long and not short, they need to have a lot of fat in between them to lubricate the fibers and make them easy to masticate. Get your mind out of the gutter.
After you’ve put all the smoke you want on it, take your digital probe thermometer and stick it into the opposite end of the shoulder blade bone longways and push it in as far as it will go. Then wrap the roast in foil VERY well. That is, lay down the foil with the shiny side down and lay the roast on it.
Then wrap the foil around the sides and back over the roast, making sure the thermometer is sticking out and the foil is tight around it. Then put another layer of foil around it. The reason is that there will be lots and lots of tasty liquid that we want to save, and if you don’t have it wrapped well the drippings will escape.
Note: the temperature we are looking for does not reflect doneness in any way. Instead, it’s just a marker for us to go off of because once we get to 195deg internal temp, then we know that the roast is cooked the proper amount of time to melt all that delicious fat intertwined into the roast meat fibers.
For the next few hours, keep your smoker going at 225-275. When you wrap the roast, it will probably be around 110-120deg. After you wrap it, the temp will start coming up relatively more rapidly.
Don’t rush it. We need it to go slow, so take your time and pay attention to the temp of the smoker and look for 195deg on internal temp. Once you get there, pull it and put it into a cooler. You know the drill…you need at least two hours of rest in the cooler, but the mass of this thing will let you go much longer. You can keep the probe in and keep the therm on and watch the temp. As long as you don’t drop too far down (130 or so), then you can let it rest a long time.
When you pull it out of the cooler, get one of those disposable foil pans. Get a deep one because the presentation is going to get kinda messy. Using your cooking gloves and with the assistance of your favorite sous chef, open up the foil and take the roast out without spilling any of the juice. The juice is good. The meat should be receded from the shoulder blade enough so you can grab onto it, give it a jiggle or two and take it out.
Jiggle to remove the bone
Throw it away…it’s duty to the world is over (or at least until some critty comes along to chew on it).
Using two large forks turned back-to-back, start ripping the meat apart. Don’t worry about being gentle, just rip. Break up all the chunks. It needs to be stringy.
When you get it all ripped apart, pour the juice over the top and toss the meat in it. Do as little or as much of the drippings as you want, but keep in mind that if you have any too much juice after serving the drippings will coagulate and make pork jello when it cools.
This is great straight up on a plate with some Texas Toast, or you can toast up some buns and throw some of the meat onto the crispy bun. Add some sauce if you like, a couple of pickles slices or onion slices, and you’ve got yourself a gen-yoo-wine TPP. Texas Pulled Pork, made the way Texans eat BBQ.
I had a pork tenderloin I needed to cook, so I fired up the smoker this afternoon for a quick smoke. I didn’t take pictures, so you guys will just have to use your imaginations.
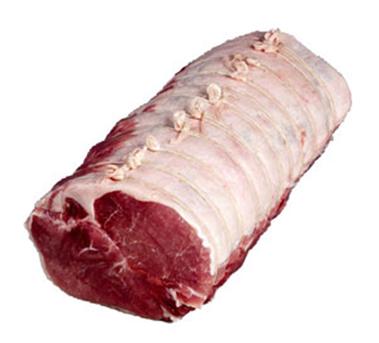
Porkloin is really fun to cook because it will take on flavor really well. The natural flavor of lean pork is really mild anyway, but especially with a cut of the pig that’s this lean. Even moreso is the fact that we are using tenderloin vs. the loin. What’s the difference? Glad you asked.
The pork loin is the porcine “backstrap”…the muscles that run along the back connected to the spine. That’s where filet mignon on a beef comes from and where the most edible non-chickenfried parts of the deer comes from. If you picture a pork loin:
You can see that there two parts to the loin separated by a thin layer of fat. The top part has a nice layer of fat on it, and if you take the entire loin and cut it against the grain you have “pork loin chops”, which are really tasty but lean pork chops. It’s the most tender part of the pig and extremely lean.
To cook this thing, we are going to need to add fat to make sure it doesn’t dry out. Fire up your smoker to maintain about 300deg. While it’s rolling, remove the porkloin from the package (there will be two pieces of meat in the package) and rinse them off with cold water. Coat them in olive oil, then add ks&p. Mince a few cloves of garlic and rub down the meat. Then chop up some fresh rosemary and rub that in as well.
You know that cheap bacon at the grocery store? It’s called “Bar S”. It’s not the best bacon, but it’s perfect for what we need here. Take three strips of bacon per tenderloin and wrap the tenderloin like a candycane. You don’t have to pin the bacon with a toothpick or anything…just wrap it and it should stay. Sprinkle the top with cayenne pepper and just a little bit of cumin, then throw it on the smoker. An hour unwrapped and then an hour wrapped at 275deg is perfect. The meat will have a great pussylip-pink ring of smoke and will be really moist, hopefully tender enough to cut with the side of your fork. When you take it out, let it sit for 10-15 minutes or so to rest. Standard fare for meat.
But wait…do you have any apples at the house? Peel and cut the apples into slices. In a pan, melt a couple of tbspn of butter and add a tblspn of sugar. When it starts to bubble, throw in the apples and some cinnamon. Cook that, stirring constantly, over medium heat until it makes a thick compote. You can even throw in a handful of golden raisins if you want. Cut the tenderloin against the grain in 1″ slices and top with the apples.
But wait even more…Take a french hoagie roll and cut it in half. Spread on some delicious Inglehoffer mustard:
…some sliced pickles and swiss cheese, then run the sandwich thru a sandwich press and you’ve got a Cubano, which is one of the greatest sandwiches alive. Do the same thing as the apples, but go with 1/2 the ingredients and use plantains instead of apples and serve it on the side.
I’ve hesitated to post this because it’s a bit of a personal recipe plus it can be difficult to make. However, I made it recently and remembered how delicious it is, so I wanted to share it with my Aggie brethren.
This is an Italian dish called “Pizzagaina”. If you are paisan, then you’d pronounce it just like it looks…peets-uh-JAIN-uh, or peets-uh-CHAIN-uh. However, up in the northeast US where this is popular, they swallow their vowels and soften their consonants, so it sounds like “beach-uh-GAIN”. When I was a kid, when we had pizza, this is what we had. It’s also called “Easter Pie” and is served a bit differently than my recipe as it has a crust on top like a pie. However, the Arcadian version is loaded up with all kinds of stuff, so there’s no room or reason to have the top. I’ve been told by the few people that I’ve cooked this for that it’s the best food they’ve ever had, especially when it’s a day old. That might be up for debate, but it’s definitely my favorite dish to cook and probably to eat when I get right down to it.
I love Italian food…the process is slow and you don’t have to rush or balance like you do in asian cooking. If you mess up, you can always add more of something else to fix it. Plus, for some reason most Italian dishes are better as leftovers after the noodles or bread has time to soak up all the flavors. If I ever own a restaurant, one of the menu items will be “Yesterday’s Spaghetti”. Please don’t steal my idea, though…that’s not Aggie-like.
The ingredients are plentiful and the method is long, so if you have any questions let me know.
You’ll start out with one of those Chef Boyardee Pizza in a box mixes. I know it sounds crazy, but after all the years of doing this I like that crust the best of all the others I’ve tried. The contents include two bags of crust mix, a sack of cheap-ass parm cheese, and a can of pizza sauce. Step one: throw away the can of pizza sauce. It’s awful stuff. Make the dough just like the box says and put the parm over to the side for later. It will actually come in handy in a bit.
Cover that with plastic wrap and set it aside. The longer it sits the better.
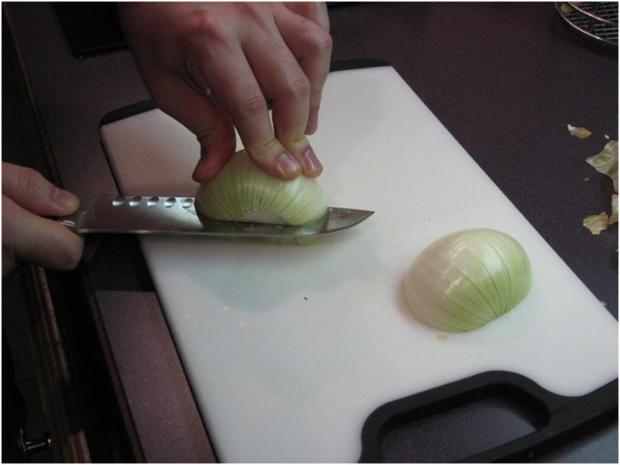
Now, let’s make the ragu. That’s the sauce we’ll use for the pizza, but it’s actually stewed for a bit with all sorts of good stuff. Dice a yellow onion (I like the sweetness of the yellow over the white). There’s an easy way to do this, by the way. Cut the onion in half and then cut it almost all the way thru the end four or five times horizontally.
Then cut it vertically.
Then against the grain to make the dice cuts.
In a pot, get some olive oil going and dump the diced onion in. Add some ks and stir. You want to be on med heat for this. Then get a shallot and do the same thing.
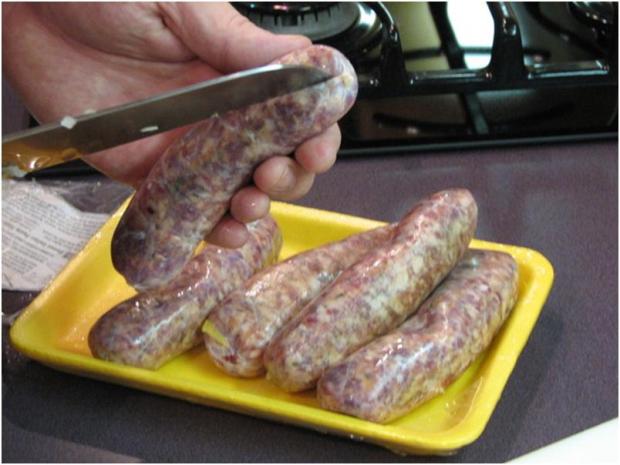
Then some garlic. I go with 4-5 cloves, but then again I like garlic. This needs to cook for a few minutes. We need the onions to be translucent, but you have to watch the garlic or it will burn. While that’s going, open up a package of sweet italian sausage links.
The “sweet” part just means that it has basil in the sausage mixture. Cut each casing down the middle and remove, then with your fingers pull chunks of the meat apart and drop it into the ragu.
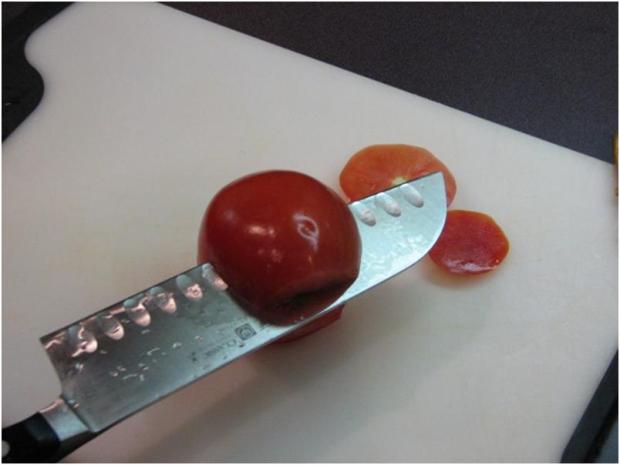
Do that will all the links (five is good). You are looking for the sausage to be cooked so stir it regularly. When it’s close to being cooked, add three tomatoes, diced.
I used romas here, only because tomatoes are out of season right now and they were the only ones that looked good. Add a bit more salt and stir.
We need the tomatoes to cook down quite a bit, but we can go ahead and add some seasoning to this. Since we already have basil in the sausage, go easy on that. However, you can go with the usual suspects of italian herbs…oregano, thyme, parsley, and add some freshly cracked black pepper. Taste it…it should have a nice, savory italian flavor.
After the toms have reduced, it’s time to add the sauce. I like Del Monte spaghetti sauce…it’s cheap and easy, and it tastes prety good. You pick the flavor…I just so happened to have this one in my cabinet.
Pour in about half the can to start out and stir. Go ahead and crank the heat up a bit…we need this to stew and reduce down some of the moisture. We won’t use the whole can, and we need to add a little at a time. This is what we are looking at:
Before tomatoes:
After tomatoes:
At this stage, throw in all the goodies that you like on your pizza that need to be stewed, i.e. olives (I like black olives, but you can use green if you like them better on your pizza), mushrooms (canned or fresh, I like canned in this dish b/c of the texture). Make sure you drain the cans. As well, I like to add some sugar to add a bit more sweetness and cut the acidity. Stir it up and let it stew with the cover OFF (we need to reduce moisture).
We are looking for a moist, thick ragu. Not soupy, but enough sauce to cover the dough. I go with just about the entire can except for just a bit in the bottom. Add the rest of the sauce (to your desired amount) and let it cook. You can see how much it’s reduced by looking at the side of the pan.
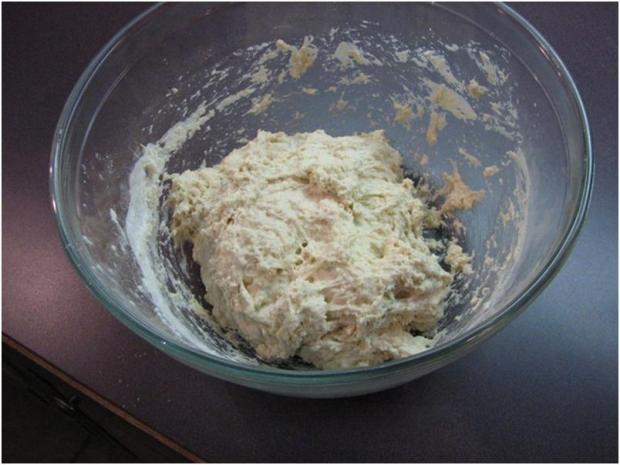
Back to the dough…it should be nice and fluffy by now in the bowl.
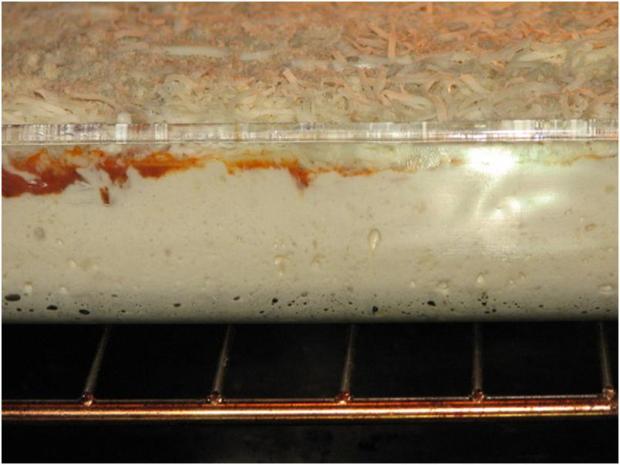
In a 13X9 or a 14X10 UNGREASED pyrex casserole dish (there’s enough oil on the dough already) plop the dough out and spread it evenly on the bottom.
Then, with your thumbs using quick strokes, pull the dough up the sides of the pan all the way around to seal up the bottom.
Pour out the hot ragu onto the dough and spread it evenly.
The rest of our ingredient list looks like this:
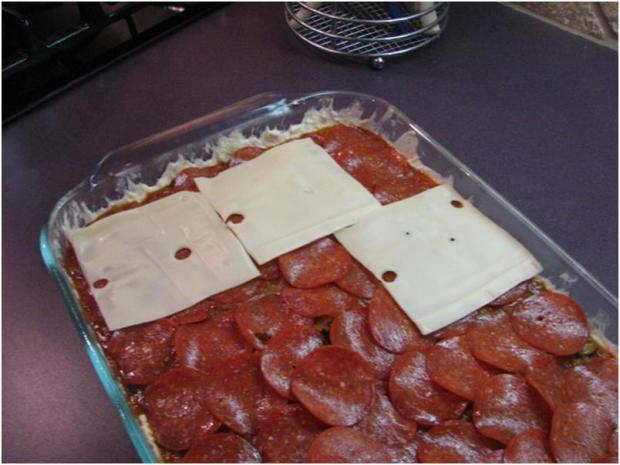
16oz of shredded mozz, 8oz of sliced swiss (aged if possible), a package of sliced pepperoni, and a packaged of sliced canadian bacon. We’re going to layer these starting with the pepperoni, then the swiss, then the candian bacon, then the mozz.
Make sure you get every layer even.
Now is a good time to put down anchovies if you like them on your pizza. My dad won’t eat a pizza w/o them.
Last but not least, take that cheap ass parm cheese packet that was in the pizza dough and spread it all around.
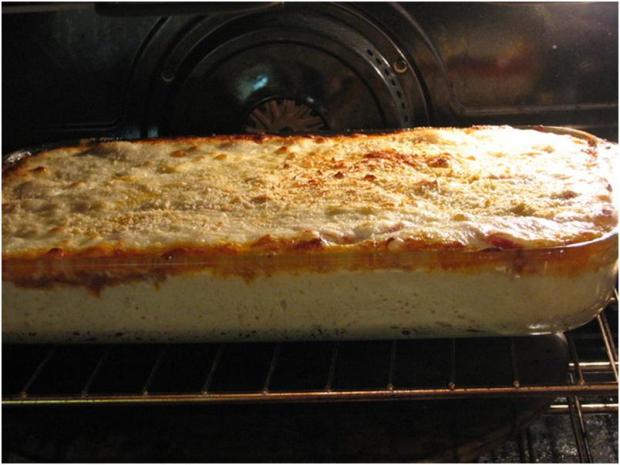
In a preheated oven at 425deg it goes for 20 minutes. Keep your eye on the cheese, though…we don’t want it to burn. However, what we are looking for is the crust to turn a blondish-brown color. That’s when it will be done.
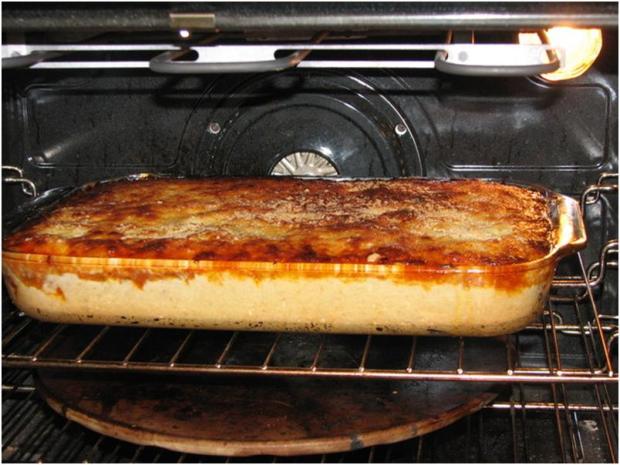
After 20 minutes, check it to see how it’s doing. It will probably need another 15-25 minutes to finish, however if your cheese starts to brown…
…then you need to LOOSELY put foil on the top of the pizza to keep it from burning.
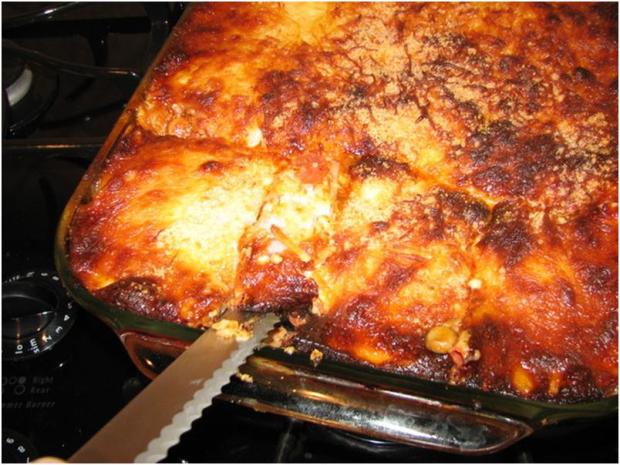
When it’s finished, it should look like this:
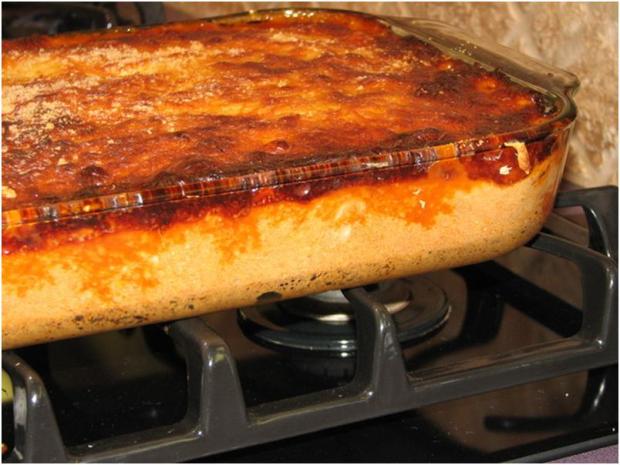
And look at this greasy goodness creeping down into the crust…Mama Lucien, that’s good stuff:
It needs to cool for at least 15 minutes before you cut it. When you go to cutting, use a coarse serated knife to cut thru the top, then go right over the same cut to slice thru the bottom crust. The crust may stick a little and the first piece is hard to get out, but I like to cut a small piece in the middle and take it out. It helps that I have a three year old to feed.
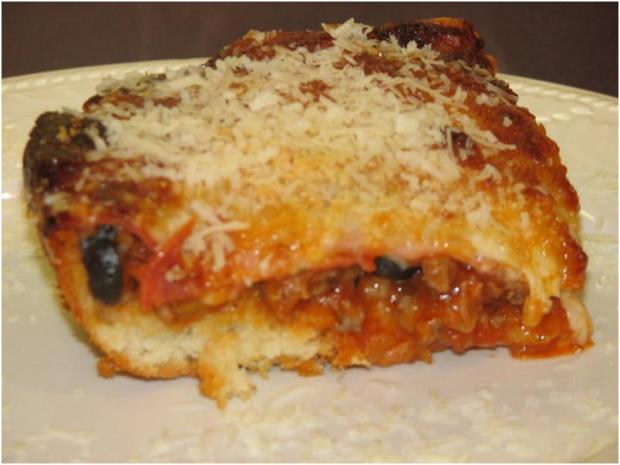
Served it on a plate and sprinkle it with freshly grated parm-reg.
With the ingredients laid out…
Ladies and Gentlemen…Pizzagaina, my favorite dish in the world.
If I have my choice of bbq, it’s going to be ribs. The meat is awesome, they are fun to cook, and you can chew on the bones when they are cooked right. Brisket feeds more people and is much easier to prepare, but ribs are what BBQ is all about. That being said, you can’t just throw a rack of ribs on the smoker and smother them with bbq sauce and expect good ribs. The best ribs are cooked for a long time with a bit of care.
There are three types of pork ribs. If you picture a butchered pig:
You can see the ribs attached to the spine directly under the loin, or the “backstrap”. Those are baby-back ribs. A lot of people get confused there because they think “babyback” is the operative word, as if the back part is “baby” or from a young pig. Actually, it should read as “baby back-ribs”, meaning that those ribs are back ribs (i.e.-contain part of the spine) and are small (“baby”). Those are the most lean and the most expensive. The next portion of the rib bones (you if you follow along the rib secion) you get the spareribs. Those are the ones we are going to eat because they have a lot of connective tissue and take smoke really well. For the record, the last part is the countrystyle ribs, which are really meaty and cut across the bone instead of with the bone. The layer of meat that lays directly on top of the country-style ribs is the part of the pork that they cut for bacon, which is the “pork belly”.
Prep
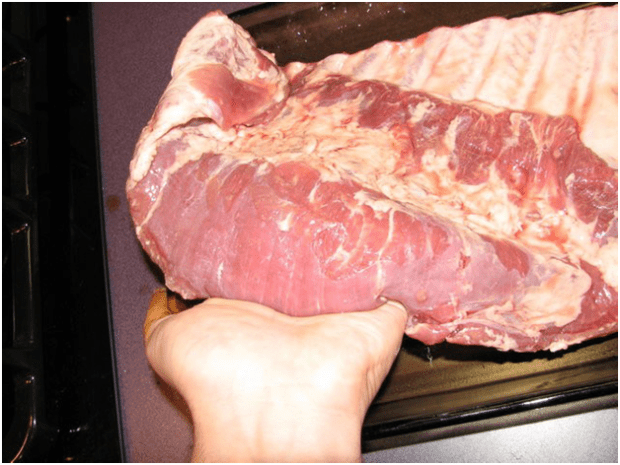
A rack of spareribs needs to be prepared or you’ll get some tough stuff. This is what we are looking at:
This is the backside of the ribs, or the concave side. These need to be trimmed. There is a flap of meat right in the middle of the rack that needs to be taken off:
As well, you need to trim off the meat at the bottom of the rack:
Both of those trimmings should be kept and cooked. They aren’t ribs, but they are delicious, so you can marinate them and cook them at the same time as the ribs. They are good testers as well so you can tell how the meat is cooking. Now, you HAVE to remove the silverskin on the concave side of the ribs. The best way I’ve found to do this is to use one of my probe thermometers. Stick the thermometer under the skin, pull it away, then peel the skin off. That’s important so you aren’t trying to eat it from the ribs when they are cooked.
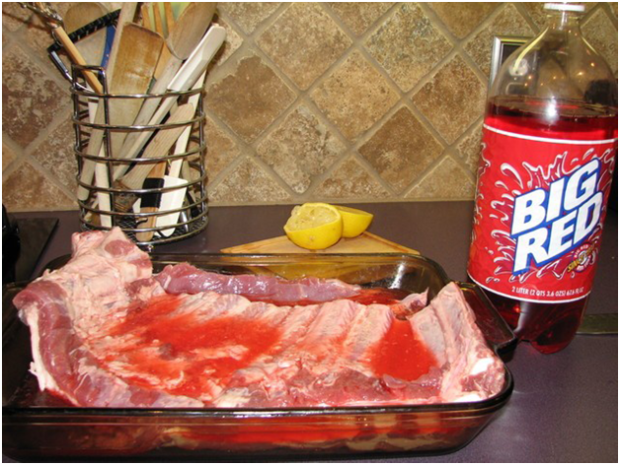
I like to wash the rack at this point under cool water just to rinse off the blood and juice that it was packaged in. Then, pour Big Red soda on it up to about halfway up the pan, squeeze half a lemon, cover with saran wrap and put it in the fridge for a few hours, potentially overnight.
That might be the white trash in me talking, but I’m a Big Red fan, especially the stuff made in Dublin with cane sugar. The soda adds the sugar that the pork needs for flavor as well as a brine because there is so much sodium in soda. As well, the lemon adds the acid that the marinade needs to start breaking down the meat fibers to be tender.
Rub
There are two types of rubs in bbq…dry and wet. We use the wet rub on the brisket, but we are going to use a dry rub on this because there is a higher surface-to-mass ratio. The wet rub will permeate the meat, but the dry rub will season just the surface, which is what we want…sweet, carmelized outside and a tender inside. That’s balance; Taoism in food.
1/4 cup light brown sugar (pack it in good)
3 tbls pepper
4 tbls ks
1/4 cup paprika (get sweet paprika, not smoked)
1 1/2 tbls garlic powder
1 teaspoon cayenne powder
1 teaspoon coriander
1 teaspoon cumin
Mix all those ingredients together well with your fingers in a bowl. That’s your BBQ rub, and it’s universal for anything you want to BBQ. If you want more heat, throw some red pepper flakes in or a bit more cayenne. Also, if you want a slightly sweeter flavor, you can go 1/2 onion powder with your garlic powder. You can store it in a ziploc for a couple months as well.
After you let the ribs marinate in the Big Red for 1/2 a day to a day, take them out and blot the surface dry with a paper towel. Don’t go overboard and try to soak up all the juice…just get the pools of juice out of there.
Take a handful of rub and cover both sides. You don’t have to have a huge layer, but you can taste the rub and see that it’s not overpowering, so make sure you get good coverage on both sides as well as the ends. The bone marrow takes seasoning very well and is good to eat. Don’t forget about the trimmings as well.
Wrap the rack back up and let it sit in the fridge again, up to a day. I like to leave it overnight, but you’ll want to go at least a couple of hours min.
Smoke
Straight mesquite is going to be a bit harsh for this, so I like to mix pecan in for the smoke. Use mesquite to get your smoker hot, then add wood at a 2:1 ratio, pecan to mesquite. Don’t let people tell you that oak is good for this. Be a real man and use mesquite. You’ll need to keep the heat at 225-250 for this one, and let’s go with a 3-2-1 smoking routine: 3 hours on the smoker unwrapped, 2 wrapped in foil (double layers of heavy duty foil and don’t put the creases down or the juice will fall out), 1 hour wrapped in the cooler. Depending on the size of the rack or how your heat fluctuates, you may need to increase to a 4-2-1 or even a 4-3-1. What you are looking for is to be able to grab onto the end of a rib bone, jiggle, and have the rib bone come out with little effort. Once the connective tissue melts down, this should be an easy feat.
Put the ribs concave side down (that’s the side we pulled the silverskin off of). As the rack cooks, the concave will relax because the connective tissue next to the bone will melt into the meat. You’ll want to put the rack away from the fire because the bone will burn really quickly if you aren’t careful. With five hours of smoke time, the ribs will have ample heat/time to cook so don’t worry about that. Again, don’t forget the trimmings…throw them right on top of the rack of ribs and let them cook. They have some fat, so the fat will melt into the meat.
After 3-4 hours, you should have a nice bark around the edges (but not scorched) and a nice red-brown color to the meat.
At this point, go ahead and wrap it up with heavy duty foil. Wrap it twice and make sure the juices can’t drip out.
You’ve got another 2-3 hours at 225-250 to let these cook in their own juices…a rib confit, so to speak.
This is one of the most beautiful sights in the world…hours of smoke turn the aluminum gold. I think it may be the work of God.
At some point, you’ll need to CAREFULLY unwrap the rack just enough to get access to the bone so you can do your jiggle test. If you spill any of that juice, I swear to you I’ll come to your house and cut your hair at the scalp with my pocketknife. DON’T do it.
After the rack passes the jiggle test, then the ribs need a good hour to three hour rest in a cooler. Take them directly (still wrapped in foil) from the heat and into a cooler. Don’t open the lid until you are ready to cut/serve. They will stay hot in the cooler, trust me. Whatever you do, don’t open the cooler for at least an hour. DON’T do it.
Take the ribs out, cut one of the ends of the foil right next to the rack and pour the juice out into a bowl. You should be able to squeeze the rack right out of the foil pouch now, so lay it up on a cutting board and cut them right in the middle between each rib (or two, depending on how many people you are serving). They are ready to eat, but if you want you can toss them in the juice. If you want them extra gooey and kinda sugary like one of those sissy Kentucky fellers, then coat them with your favorite BBQ. These are good enough without any sort of sauce. If you go with sauce, try to do one on your own or try one without a whole bunch of sugar, like Stubb’s (which is my favorite bottled bbq sauce).


 \\
\\