Bob the Cook’s Pit

One of my favorite things to do in life is to cozy up with a beer on a Texas afternoon and do some outdoor cooking. It’s what Arcadia is all about…sharing what you know and do well with your friends and neighbors. In my case, I love seeing the creations that my fellow Arcadians come up with and the crazy things we make different cookers out of. My buddy down in Madisonville made a smoker out of a barrel; my dad’s fish cooker is made from an old gas water heater; and one of my favorite outdoor cookers is my plowdisc wok. I can do fajitas and breakfast tacos on that thing to feed a small army and/or a group of tailgating Aggies.

Across the country, you’ll find cooking competitions of all sorts: chili, BBQ, steaks, or even full chuck wagon competitions where you have multiple dishes as part of the submission. One of the most well-known of the outdoor cooks in our neck of the woods is Bob the Cook out at Wildcatter Ranch. Bob is an incredible gastronomist. He knows his food and knows his wine. If you ever get a chance to make your way to Young County, Texas, make sure you stop by Wildcatter Ranch and let Bob pair up a bottle of his favorite wine from his extensive wine list with a slab of medium-rare Texas beef and then top it off with his banana pudding in a Mason jar.

Bob the Cook (or “BtC” as we like to refer to him) recently catered in ribeyes to a function in downtown Arcadia. Never passing up an opportunity to sidle up to a genuine Texas cooking rig built and used by someone I regard so highly, I got a chance to snap a few pics and talk to BtC a bit about how he goes about making ribeyes for so many people at once.

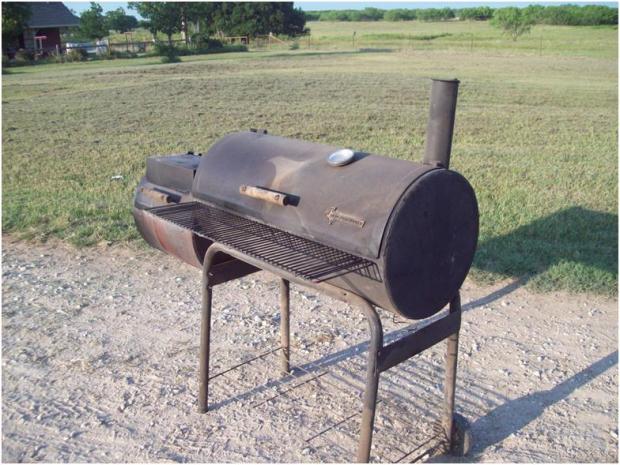
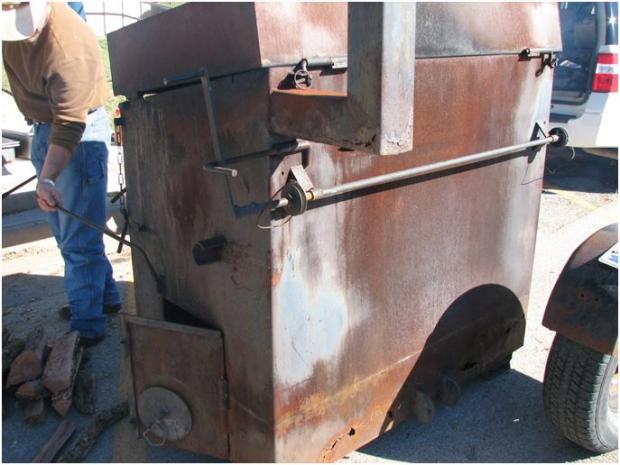
It starts with his pit. He made this out of a U-shaped pipe that he had bent to a box. Now, this thing has been used time and time again and had to sit out in the Texas weather, so some of the original features aren’t quite as functional as they once were, but the design is still awesome. BtC used a design idea from the great Joe Allen in Abilene, but put some proper modifications on it to increase efficiency for an outdoor unit.

Here this bad boy is with the lid up:

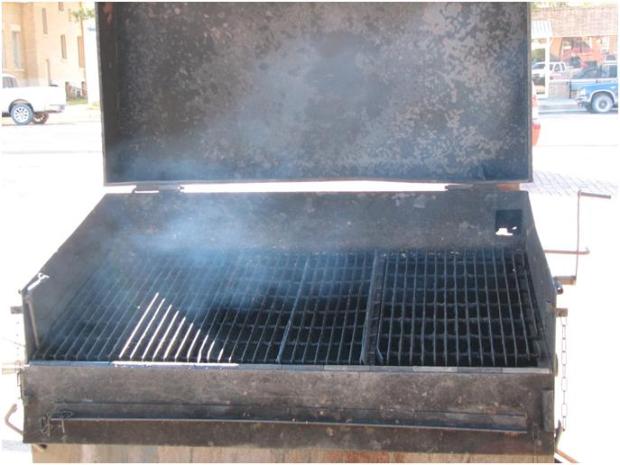
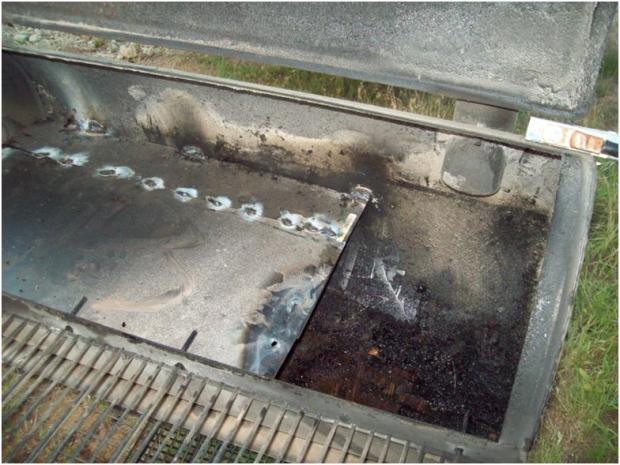
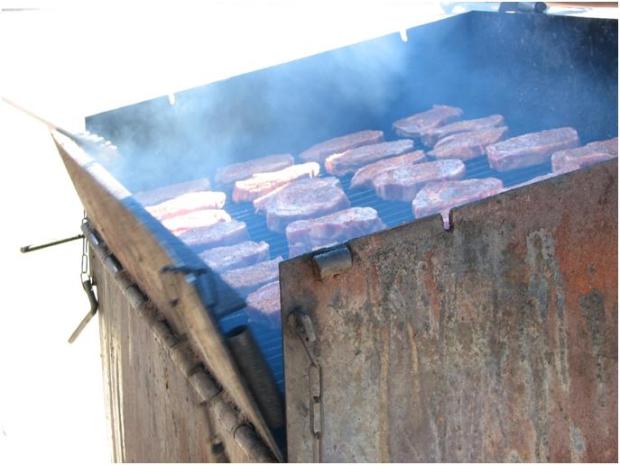
You’ll notice that the grill grates are on a slant. That’s key for a steak cooking pit so you can adjust the amount of heat on the meat. Steaks with less marbled fat are going to cook much faster than the ones that have tons of flavorful fat, so you want to put them in a cooler spot on the grill or pull them earlier. Also, notice the lip that folds over in the front. That has two functions: first of all, it allows for easy access to the cooking surface as well as for moving the grills to an angle. See the bar on the inside of the lip? You can put the grates on that for an even cooking surface when you are doing things like sausage. The other function it has is that it can be propped up from underneath so you can use it as a flat working surface for your tools or bins holding the meat you are putting on the grill.

The firebox has two entrances in for proper flow, and you can adjust the flow in on both sides. There is a chimney on the back side of the lid, but BtC admits that the design is somewhat flawed. Moreover, the chimney just acts as a stop for the lid so it doesn’t flop all the way back.

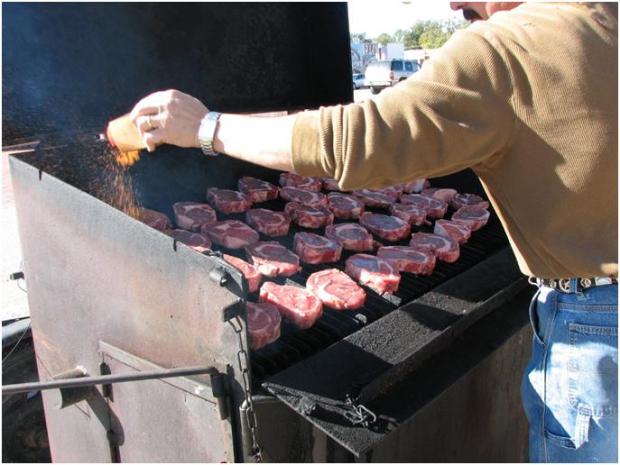
You can see how easy it is to get to the working surface from here. BtC puts the beef onto the grates before he seasons them so that the meat warms up and absorbs the seasoning all at once. Also, he keeps the meat that will cook faster on one side so he can properly tell how well done the meat is. The fire is well enough away from the meat so you don’t have crispy char on the steaks.

You can see from the backside that there was a pulley system at one time to raise and lower the fireplate, but years of use and weather rusted out the bottom. BtC had to have an additional plate welding in recently for repair, so the pulley system is non-functional now.

This is BtC’s trailer, specifically built for the cooker. He can haul and move this all by himself, which is remarkable because the cooker itself weighs hundreds of pounds. He took an old axle from a junk pile and made a long tongue on it for counterweight. Then, he welded a stinger that pins onto the cooker itself.

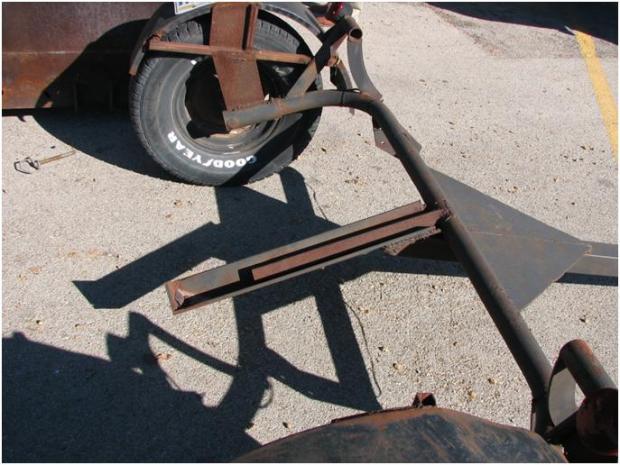
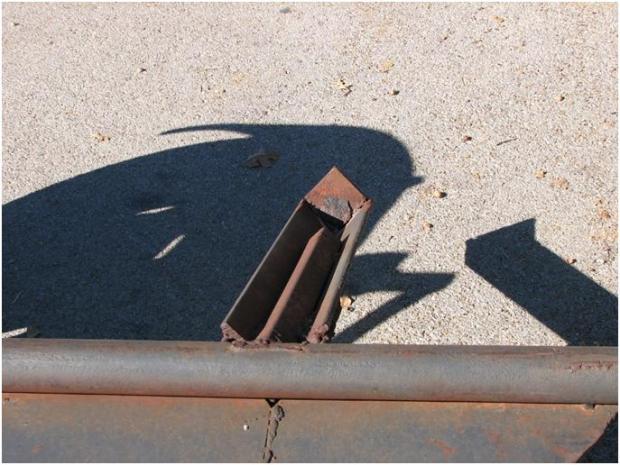
Right by the door on the side cooker, you’ll see a halfpipe. Also, on the trailer you’ll see bars that go across. BtC engineered this so the bars on the trailer go into the halfpipes on the cooker as a latch. With the trailer tongue up in the air, he latches the pin in place on the stinger and can pull the tongue down and attach it to his truck. The tongue is counterweighted perfectly so you have a zero balance right on the axle.

Using rebar and pipe, he engineered a hinge system as well as a poking bar all in one. You can see the bar there…he’ll use that to close the doors on the fire box as well as to reach up with the hook to pull the lid down during the cooking.

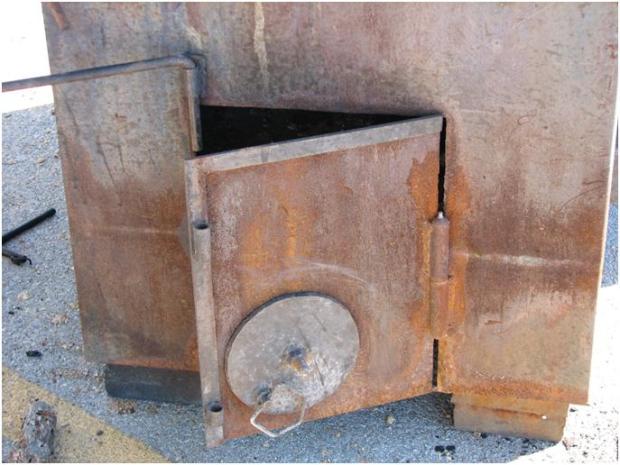
Secure pins are chained to the side so you don’t lose them. This is a great shot of that lip in the front.

There you have it…a Texas steak pit, fully mobile and as efficient as you can get for outdoor cooking.

The Smoker Project – Rehabilitating a Backyard Cooker

When you decide that you want to get into cooking as more than just sustenance and more of a hobby, one of the things you have to do is evaluate your gear. You don’t have to have the best gear and you may not have the money to spend on the most expensive equipment, but you need to have the right tools for the job. One of the things I love to do most is to smoke on a good smoker. The flavor of smoke combined with the caramelized flavors from your rubs and the “bark” of the meat is an art. Competitions around the country for smoked meats begin and end with the competitors trying to outdo each other on their rigs, and quite often they rip ideas off from each other to make the most complete cooker possible.

The question I get most from my friends who I cook for and are interested in getting into the hobby is, “What kind of ____ should I get?” People will try to skip a few steps in the learning process and go straight to overbuying for their skill of cooking. You have to spend time learning how things are cooked to really understand what kind of gear to get, although you never want to go with the cheapest thing you can find.

It’s like playing guitar. Sure, you can go out and buy the most expensive guitar you can find, but you won’t really appreciate it if you have no idea how to play a guitar. Most teachers will tell you to get as much as you can afford when you are starting out, then upgrade as you begin to know the difference. Always try different pieces, but most important is to get as good as you can get on your own, then try out other people’s instruments when you can and figure out what you like more/less about yours compared to theirs.

Now then…with all that out of the way, there is something that you should know: despite what hobby you are getting into, you should always try to minimize the amount of work you have to do in order to get the best results.  That goes double for cooking food.  Furthermore, if you don’t mind being a little bit creative and once you get your feet under you, then you should take the opportunity to use what you’ve learned and put it to practice. In regards to any smoker, these are the things you need to have as a constant:

-regulated temperature that’s not hard to control

-good airflow from intake (where the air comes in) thru flue/chimney (the “exhaust pipe”) and out the vent (where the smoke comes out)

-no flames directly on the meat

I don’t care how big or small your smoker is, if you don’t have those three things you won’t have a good experience. There are many other things you need to do, but those three are constants.

In regards to our backyard smoker project, we’ll keep those same things in mind. I had a smoker that was about five years old. I mainly kept it at my house for quick meals and I can use it as a pit because the firebox (where you build the fire) has an area for me to put a grill rack in for direct grilling. However, like any smoker off the rack, it’s not exactly built for heavy-duty use. After a few years, the paint was gone and rust sat in. Sometimes meals turned out good, sometimes they didn’t, mainly because it’s hard to control temperature on a smaller rig.  If you are handy with a welding rod, you can do some amazing things.  So, off to the Arcadian Ranch we go to do some metal fabrication.

This is what we are working with:

It’s just your standard smoker. This one is manufactured by a company called New Braunfels, and I think it came from Academy for $150. Nothing expensive…just a typical little smoker that definitely has its place in the world.  When you open it up:

You have decent access to the grill, which is actually pretty good sized. You can put a whole brisket in there and probably a rack or two of ribs at one time. That’s crowding it, though because:

The hole that goes to the firebox lends itself to direct flames on the meat. Direct flames create carbon, which is NOT GOOD TO EAT. A closer look at the firebox and the hole that goes to the smoking chamber (where you put the meat) shows the inefficiency of the design:

I took one of the grill grates off so you can see. The hole is so big that once you get a fire going, there’s nothing to stop the fire from attacking your food. Also, note that ash and cinders that are picked up in the airflow will be carried directly into the smoking chamber without anything to slow it down. Ash on food is NOT GOOD TO EAT.

The firebox design is pretty good, all things considered. You have a hinged door, a nice long handle to move the smoker, and a way to control your airflow.

Speaking of airflow, let’s go ahead and look at the basic design flaws that we are trying to remedy. First of all, airflow is key when you are trying to smoke. One of the basic principles that people fail to learn early on when taking on the hobby is how to make the damn thing work. You have to open up the vent (where the smoke comes out) and adjust the intake (where the air goes in) to regulate the temperature. Never, ever, evereverevereverevereverEVER close down the vent on the top. Creating an area that has stagnant airflow will result in building up a creosote, and creosote is NOT GOOD TO EAT. This particular smoker is originally designed so the air flows like this:

That’s a great design if you want to be able to get this thing fire engine red and cook the ever living shit out of anything within about a five foot radius. The suction from the intake is so strong you can actually feel it if you put your hand down there. As well, the air almost feels like it’s being propelled by a fan coming out of the vent. That’s just not what we are looking for if we want to keep our temp around 225-250® for 6-20 hours at a time. What we want to do is keep the good airflow but minimize the exposure to flame. To do this, we are going to need to put a plate inside the smoking chamber right under the grills over that giant hole. We want the airflow to be more like this:

This will:

-allow us to keep the temperature down (much lower than before)

-keep good airflow to reduce the risk of creosote

-eliminate the food in the smoking chamber from direct flames

Boom. That’s our design. It’s the design that any smoker should have. You can add on modular pieces, like a warming box or even another stack so that it’s easier to get the fire started to begin with, but we want the smoke to travel under the grill for heat and then across the meat for flavor and then out as soon as possible.

Let’s start with the plate running across the bottom. I didn’t take pictures of the welding itself, but you could imagine how hard it is to weld on thin metal that’s rusty, especially when you are welding it to brand new sheet metal. There are actually two pieces of sheet metal here that we’ve overlapped for strength. By placing the sheets directly under the lip of the smoker, we’ll have built in stability. As well, we need to tack a few spots along the side to keep it up. You could put in a brace underneath for stability, but once the weld should hold them in place. There won’t be any weight on them other than the drippings from the meat.

As well, we need to put a level on the plate and make sure that it’s tilted down towards the hole where grease falls out. Otherwise, you’ll have excess buildup that could create a flame.

Once we get the first plate on, we’ll slide the other one on and attach it both to the smoker body itself as well as the first plate we put down.

It doesn’t have to be air tight, but it does need to direct the airflow down the chamber as well as keep flames from licking the bottom of the food.

I have to move that chimney over to the other side of the smoker chamber. I stuck a piece of cardboard up to the hole from the inside and traced the hole with a pencil. Then, I cut the hole out and cut a hole into the chamber on the exact same spot on the opposite side of the back of the smoke chamber.

Now, I need to seal up the original chimeny hole.  I just took another piece of sheet metal and cut it into halves, putting one section on the outside and one on the inside, making sure they covered the hole completely.  Using the same bolt holes as before, I bolted the sheets on.

That creates the perfect path for smoke/air to flow so that I achieve my three constants of not being able to control my heat easily, not having stagnant air, and not having flame ups.  Once it’s all finished, I took a product called Ospho and coated the outside.  That kills the rust and it’s now ready for high heat paint.  (The two pictures above are post-Ospho)

After the paint cures for a couple of days, then go ahead and fire it up and get it hot.  With a spray bottle of oil, cover the outside and let it season.  Same on the inside…you need to spray it down when it’s hot with oil from time to time to make sure it keeps its season.  Once it’s seasoned, you can go ahead and cook on it.

There she is…my little backyard smoker.  I will add some other modifications down the road, like a more stable brace and bigger wheels, but as for now it’s ready and functional.  As they say in the Army and in prison:  smoke ’em if you got ’em.

Texas Prairie Martini

There’s a part of me…a rather LARGE part of me…that loves a nice cold glass of liquor. The best alcoholics choose vodka as their boisson de choix, and who am I to argue with the experts?

There’s nothing like an ice-cold martini. Some prefer the Xmas tree lingering taste of gin, some like a little bit of vermouth; it all depends on the mood and most importantly depends on the drinker. That being said, there’s an equal if not greater part of me that’s North Texas white trash pedigree with a palatte for food that is hard to describe to most normal humans. We like our taco burgers, our Pittsburg Hot Links, and our pickled eggs. You put the two together and you have this incredibly dynamic mix of either delicious cocktail greatness or just a country washboard glass of goodness.

Up north of the Blackland Prairie where I grew up is the beautiful town of Muenster, Texas. If you want to throwback to the best of anything north of Dallas, you’ll find that this little town has it all. It’s a German town of about 1,500, and these people keep their town as clean as they can. There are two schools, one 2A school and one Catholic school (Sacred Heart ISD). The two schools are literally across the street from each other. Muenster hosts their annual Germanfest celebration, a half-concert/half-food festival in the last week of April every year. We don’t miss it in our family…I think we look forward to it more than we do Christmas. If you get a chance, you should make a day or even a weekend out of Germanfest in Muenster, Texas.

In downtown Muenster, there’s my favorite grocery store on the planet: Fischer’s Meat Market. Not only do they have a great selection of beer, wine, and Affiliated Foods groceries (the gears in any white trash family in north Texas), they have an incredible butcher counter (the back part of the store is also a slaughterhouse where you can take your beef to be dressed out), fresh German bakery items, and an entire row of canned/jarred food items that any north Texan would fall all over him/herself over. You can get apple butter, Hot N Spicy mustard, pecan pie in a jar, or any type of jelly you can think of including jalapeno jelly, muscadine jelly, or peach preserves. Right in the middle of this goodness is one of my favorite things in the world…pickled eggs. And not just any type of regular old pickled chicken egg; they have pickled quail eggs. This is the inspiration to this drink: leaning back on Lake Nocona on the Texas Prairie and sucking one of these down is as close to nirvana as possible (without the heroin).

First of all, to make a proper martini, you’ve got to chill the glass. Fill a martini glass with ice and then water and let it sit for a few minutes.


In the meantime, let’s review the ingredients list:

In that Aggie pub glass, we’re gonna throw in a few cubes of ice, three fingers of vodka, and another finger of the olive juice. That’s a pretty dirty martini…you can cut down on the olive juice if you prefer it to be sweeter and less olivey. What is a finger? Hold your finger up to the side of the glass and fill it up to the top of your finger. Then dump it all into the silver shaker, cap with the pub glass and shake three or four times to get it all mixed together. Dump out the ice water in the martini glass and clean out the extra water. Strain the vodka into the glass.  If it’s short, pour a bit more vodka into the glass, but don’t worry about stirring…that will come later.

Now comes the fun part. At Central Market, you can find a white cheddar called Isle of Mull. It’s incredibly sharp, but absolutely delicious. Take a bamboo skewer and run a couple of pickled eggs onto it. Then break off a hunk of cheese, and then top it off with a single olive. Break off the extra part of the skewer, but leave just enough to be able to hang onto it. Holding the broken end of the skewer, swirl the cocktail swizzle around in the vodka a couple of times to mix in the extra vodka (if necessary) and then serve with it across the rim of the glass (so the cheese doesn’t fall apart).

Voila…a Texas Prairie Martini, the perfect white trash cocktail and an awesome way to enjoy your cold liquor.

Trav’s Corner: Speckled Trout Tacos

One of the great things about being a food junkie is you get to find other food junkies and learn how to really cook things right.  Our S. Texas buddy, Travis, is a REAL foodie; a bona fide professional chef who left the trade for a normal job.  We’ve invited him to share some of his favorites from time to time here on AE.

——————————————————————————————

My corner of Arcadia is on the beach at South Padre Island. We’ve got a little place on the bay in Port Isabel with a dock and we keep an underwater light there that comes on at night to attract speckled sea trout. Not only are these fun to catch, but they’re also real good eating. My 7 year old son likes to catch a couple every night. We keep them for trout tacos. Here’s how I do it.

First, you’ve got to filet the fish. Start by laying the fish on the cleaning station with his back towards you.


Lift up the side fin and position your filet knife right next to the fin with the back of the knife at a diagonal towards the head:


Cut straight down to the backbone, and then turn the knife so that it cuts along the backbone.

 It’ll be tough at first as you’ll have to cut through some ribs, but after you get through that, it’ll go real easy all the way to the tail. Some people like to leave a piece at the end attached to the tail to make it easier to skin, but I prefer to cut it all the way off. Next you’ll want to remove the ribs. Place your knife right along the rib line and cut down at an angle, following the rib bones.


To get the skin off, lay the filet flat against your cutting surface, skin side down. Holding your knife flat, start at the tail end and cut through a little piece of meat to the skin.


Hold onto this piece with one hand and move the knife back and forth with the other. Let the knife do the work. Don’t try to push the knife along, and don’t pull the skin. This takes practice, but you can just trim off any skin you miss. Now turn the fish over and repeat.

 After you wash them off, you’ve got two nice filets. The next step is seasoning. I could put together some bad ass blend, but Tony Chachere already did:


Sprinkle this stuff on liberally, and then the filets go into a hot nonstick pan with canola oil. Cook over high heat until browned and then turn over and do the other side:

Note: searing with Tony’s can result in some pretty caustic fumes. Make sure your vent hood is on (assuming it vents to the outside) or make sure your kitchen is well ventilated. Once the filets are browned on both sides, remove from the pan and place on a paper towel or rack to drain.

While they’re draining, heat a tortilla in a dry pan until warmed through. I like Mission multigrain tortillas with this for health reasons (and cause they’re really good), but you can use corn or flour or whatever.

Once you’ve got all the tortillas warmed up (two filets makes about 6 tacos) you can start assembly. Break off a piece of filet long enough to cover the tortilla lengthwise. Next, spoon on some Greek yogurt:


This is some good stuff, and you can use it like sour cream. Next, squeeze some lime juice on there and start adding toppings. Here’s one with tomato, avocado and sprouts, but you can go with what you like here, including cabbage, peppers, onion, lettuce, cheese, cilantro, etc.


Now sprinkle on your favorite hot sauce and go to town. I usually serve with rice and beans.

Special note: you inland types can sub bass or catfish for the trout. Tilapia will do in a pinch. Just go with white fleshed fish and you should be fine.

Pulling Your Pork – The Essence of BBQ

I’m a Texan, and any good Texan loves BBQ. However, BBQ can be a tricky. You can’t just throw a slab of meat onto a grill and then slather it with sticky sweet sauce and expect to have good BBQ. BBQ needs LOOOOONG slow cooking with delicious smoke from well-seasoned wood. What that means is that you have to have a piece of meat that has lots of fat, so chicken breasts and backstrap are out. Those boys in Tennessee and South Carolina know this as a BBQ must.

Here in cattle country, we know that brisket is the key to a Texas BBQ. And if you’ve read the Big Red Ribs recipe, you know that if you are going with ribs they need to be pork ribs and not beef. However, Texans have a really bad habit of overlooking the greatness of the Boston Butt. It could be because it’s pork and not beef; it could be because it’s got a yankee name and the fact that yankees call a shoulder roast a “butt”. Let’s overlook the sins of our sisters from the North and look deeply into what could potentially change everything you’ve known about BBQ and become a staple in your stable.

They call this thing a pulled pork; if you go to a Hard Rock Café, you should find a dish called the Tennessee Pulled Pork or the “TPP” (‘If you’ve been to the HRC and you haven’t had the TPP, you haven’t been to the HRC’). Before they closed the HRC in Dallas, that was one of my favorite things to get. I actually had a kidney stone attack one time eating a TPP, but it’s so good I hung in there for the whole sandwich before heading to the emergency room. True story. On a toasted bun, this might turn into your favorite BBQ sandwich, and again…this is coming from a Texas Beef fan.

First of all, let’s take another look at our pig diagram:

Right above the ear, you’ll see the words “Boston Butt”. Yeah, it’s the shoulder. They also call this a “blade roast”. Either way, when you go shopping you’ll be looking for the biggest slab of non-ham pork you can find. Note: there’s also a “picnic roast”, which is a nice alternative if you can’t find a shoulder roast. However, the bone isn’t quite as easy to remove for presentation, so stick with the shoulder if you can.

In the package:

That’s an eight-pounder, which is about the average of what you’ll find. On occasion you’ll run across one a little bigger or smaller, but for the most part that’s what you’ll get when you buy one. First thing’s first….take it out of the package and rinse it under water. Be careful…there are a couple different muscles here, so it may try to fall apart on you. When you get it rinsed off and set aside, let’s get the bag out. I like to use a turkey bag. Reynold’s makes a perfect product for this:

Take the bag and put it into one of those cheap plastic storage bins.

I’m doing two roasts here, but you can double this up easily in the same bag and bucket.

Go ahead and put the roast(s) in the bag. Now, for the next 24 hours, we need to brine this bad boy. Remember…a brine is for moisture, not for flavor. If any flavor is garnered from the brine, it’s a bonus and not the original intent. The brine will be a mix of sugar, salt, and acid to break down those muscle fibers to be as tender and moist as possible. For our brine we are going to use about this much apple juice:

Just pour it right into the bag. No reason to scrimp, but no reason to over do it.

And about this much apple cider vinegar (about a cup):

You can mix them right in together. Swish ’em around a bit, but you don’t have to worry about getting them perfectly mixed. Go ahead and close up the bag and get as much air as you can out. It’s not imperative to get it air tight, but it will keep your fridge from being too vinegared up if you get it closed.

Into the fridge it goes for the night. The next day, take it out of the fridge, unfastened the closure and pour as much of the liquid out as possible. We are going to use a dry rub on this, so you want to make sure you get as much liquid out as possible. No reason to save the brine…it’s done it’s job, and we’ll have ample liquid from the drippings from this after it’s cooked.

Using the Arcadian BBQ rub, liberally coat these things down on all sides and any cracks and crevices you can find. Then, put it back into the bag and close it back up. It needs another night to get seasoned up.

So that your timing is right, this is your timeline:

Day 1: brine in the evening, in the fridge overnight and into the next evening

Day 2: season with rub, into the fridge overnight

Day 3: smoking for six-ten hours (including the rest)

Fire up your smoker. Now, you guys know how I feel about mesquite. That’s not changing. However, I really like pecan/hickory on this recipe. Because you are cooking for so long, though, you’ll want to use a mixture. Mesquite is a harder wood and will cook hotter and longer than pecan, which is a softer wood. That’s why my nickname in college was “Mesquite”. What’s up, ladies?

Get your smoker rolling to 225-250deg and put your roast on fat side UP. It’s totally up to you on how much smoke you put on it, but you need at least 2 hours of pure unadulterated smoke. Some might argue with me on the fat thing, but if your smoker is designed correctly you’ll have indirect heat, full smoke, and the fat will melt into the meat fibers. That’s important in this dish. You see, it’s different from brisket because on brisket we cut against the grain. However, with TPP we are going to literally pull the pork apart so the meat fibers will be long. Since they are going to be long and not short, they need to have a lot of fat in between them to lubricate the fibers and make them easy to masticate. Get your mind out of the gutter.

After you’ve put all the smoke you want on it, take your digital probe thermometer and stick it into the opposite end of the shoulder blade bone longways and push it in as far as it will go. Then wrap the roast in foil VERY well. That is, lay down the foil with the shiny side down and lay the roast on it.

Then wrap the foil around the sides and back over the roast, making sure the thermometer is sticking out and the foil is tight around it. Then put another layer of foil around it. The reason is that there will be lots and lots of tasty liquid that we want to save, and if you don’t have it wrapped well the drippings will escape.

Note: the temperature we are looking for does not reflect doneness in any way. Instead, it’s just a marker for us to go off of because once we get to 195deg internal temp, then we know that the roast is cooked the proper amount of time to melt all that delicious fat intertwined into the roast meat fibers.

For the next few hours, keep your smoker going at 225-275. When you wrap the roast, it will probably be around 110-120deg. After you wrap it, the temp will start coming up relatively more rapidly.

Don’t rush it. We need it to go slow, so take your time and pay attention to the temp of the smoker and look for 195deg on internal temp. Once you get there, pull it and put it into a cooler. You know the drill…you need at least two hours of rest in the cooler, but the mass of this thing will let you go much longer. You can keep the probe in and keep the therm on and watch the temp. As long as you don’t drop too far down (130 or so), then you can let it rest a long time.

When you pull it out of the cooler, get one of those disposable foil pans. Get a deep one because the presentation is going to get kinda messy. Using your cooking gloves and with the assistance of your favorite sous chef, open up the foil and take the roast out without spilling any of the juice. The juice is good. The meat should be receded from the shoulder blade enough so you can grab onto it, give it a jiggle or two and take it out.

Jiggle to remove the bone

Throw it away…it’s duty to the world is over (or at least until some critty comes along to chew on it).

Using two large forks turned back-to-back, start ripping the meat apart. Don’t worry about being gentle, just rip. Break up all the chunks. It needs to be stringy.

When you get it all ripped apart, pour the juice over the top and toss the meat in it. Do as little or as much of the drippings as you want, but keep in mind that if you have any too much juice after serving the drippings will coagulate and make pork jello when it cools.

This is great straight up on a plate with some Texas Toast, or you can toast up some buns and throw some of the meat onto the crispy bun. Add some sauce if you like, a couple of pickles slices or onion slices, and you’ve got yourself a gen-yoo-wine TPP. Texas Pulled Pork, made the way Texans eat BBQ.

You and Your Dog

(originally printed in the Graham Community Profile)

I was raised in Young County and have a history in this community. My ancestors settled here in the mid 1800s and homesteaded a cattle ranch that is still operated today by my father.  My great-great-great grandfather was one of the original founders of the Texas and Southwestern Cattle Raisers Association, which was formed in Young County. My roots run deep in this place.

After graduating from Graham High School in 1990, I left home that fall for college. I could hardly wait to leave and start the next chapter of life. For 17 years I followed my marketing and public relations career.  And it took me places … I frequently traveled abroad for business. I lived and worked in Chicago, Ann Arbor, Mich., and Dallas. But just as Dorothy said in the Wizard of Oz, “there is no place like home.”     

After Michael and I married we wanted to live a more authentic life.  We wanted to know our neighbors, their children and the names of their dogs.  Graham is that kind of place and that’s why we decided to move and raise our family here. 

I can’t fully express the feeling of waking up that first morning after moving knowing, that I am no longer a rat in the middle of the rat race.

I am thrilled to come home and to have the opportunity to put my skills and experience to use for the betterment of the Graham Chamber of Commerce. But most of all I’m glad to be living in this community raising our child knowing his grandparents, neighbors and their dogs.