If I have my choice of bbq, it’s going to be ribs. The meat is awesome, they are fun to cook, and you can chew on the bones when they are cooked right. Brisket feeds more people and is much easier to prepare, but ribs are what BBQ is all about. That being said, you can’t just throw a rack of ribs on the smoker and smother them with bbq sauce and expect good ribs. The best ribs are cooked for a long time with a bit of care.
There are three types of pork ribs. If you picture a butchered pig:

You can see the ribs attached to the spine directly under the loin, or the “backstrap”. Those are baby-back ribs. A lot of people get confused there because they think “babyback” is the operative word, as if the back part is “baby” or from a young pig. Actually, it should read as “baby back-ribs”, meaning that those ribs are back ribs (i.e.-contain part of the spine) and are small (“baby”). Those are the most lean and the most expensive. The next portion of the rib bones (you if you follow along the rib secion) you get the spareribs. Those are the ones we are going to eat because they have a lot of connective tissue and take smoke really well. For the record, the last part is the countrystyle ribs, which are really meaty and cut across the bone instead of with the bone. The layer of meat that lays directly on top of the country-style ribs is the part of the pork that they cut for bacon, which is the “pork belly”.
Prep
A rack of spareribs needs to be prepared or you’ll get some tough stuff. This is what we are looking at:

This is the backside of the ribs, or the concave side. These need to be trimmed. There is a flap of meat right in the middle of the rack that needs to be taken off:
As well, you need to trim off the meat at the bottom of the rack:
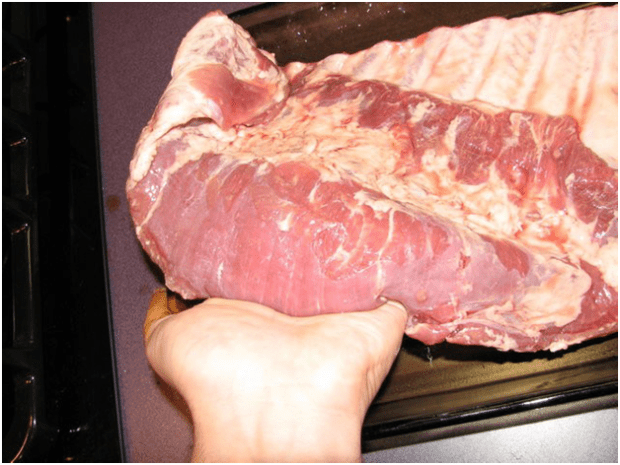

Both of those trimmings should be kept and cooked. They aren’t ribs, but they are delicious, so you can marinate them and cook them at the same time as the ribs. They are good testers as well so you can tell how the meat is cooking. Now, you HAVE to remove the silverskin on the concave side of the ribs. The best way I’ve found to do this is to use one of my probe thermometers. Stick the thermometer under the skin, pull it away, then peel the skin off. That’s important so you aren’t trying to eat it from the ribs when they are cooked. 

I like to wash the rack at this point under cool water just to rinse off the blood and juice that it was packaged in. Then, pour Big Red soda on it up to about halfway up the pan, squeeze half a lemon, cover with saran wrap and put it in the fridge for a few hours, potentially overnight.
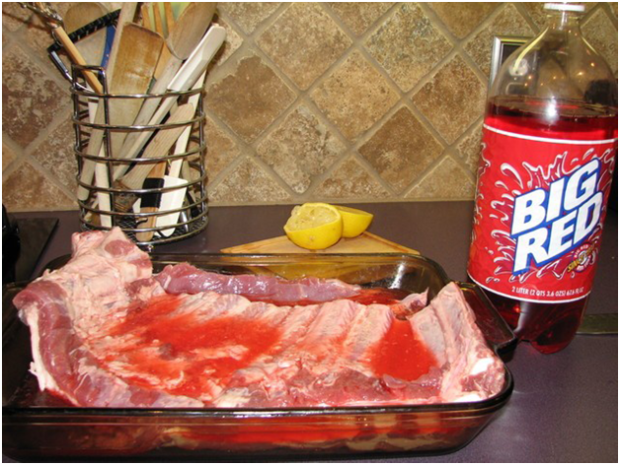
That might be the white trash in me talking, but I’m a Big Red fan, especially the stuff made in Dublin with cane sugar. The soda adds the sugar that the pork needs for flavor as well as a brine because there is so much sodium in soda. As well, the lemon adds the acid that the marinade needs to start breaking down the meat fibers to be tender.
Rub
There are two types of rubs in bbq…dry and wet. We use the wet rub on the brisket, but we are going to use a dry rub on this because there is a higher surface-to-mass ratio. The wet rub will permeate the meat, but the dry rub will season just the surface, which is what we want…sweet, carmelized outside and a tender inside. That’s balance; Taoism in food.
1/4 cup light brown sugar (pack it in good)
3 tbls pepper
4 tbls ks
1/4 cup paprika (get sweet paprika, not smoked)
1 1/2 tbls garlic powder
1 teaspoon cayenne powder
1 teaspoon coriander
1 teaspoon cumin
Mix all those ingredients together well with your fingers in a bowl. That’s your BBQ rub, and it’s universal for anything you want to BBQ. If you want more heat, throw some red pepper flakes in or a bit more cayenne. Also, if you want a slightly sweeter flavor, you can go 1/2 onion powder with your garlic powder. You can store it in a ziploc for a couple months as well.
After you let the ribs marinate in the Big Red for 1/2 a day to a day, take them out and blot the surface dry with a paper towel. Don’t go overboard and try to soak up all the juice…just get the pools of juice out of there.
Take a handful of rub and cover both sides. You don’t have to have a huge layer, but you can taste the rub and see that it’s not overpowering, so make sure you get good coverage on both sides as well as the ends. The bone marrow takes seasoning very well and is good to eat. Don’t forget about the trimmings as well. 
Wrap the rack back up and let it sit in the fridge again, up to a day. I like to leave it overnight, but you’ll want to go at least a couple of hours min.
Smoke
Straight mesquite is going to be a bit harsh for this, so I like to mix pecan in for the smoke. Use mesquite to get your smoker hot, then add wood at a 2:1 ratio, pecan to mesquite. Don’t let people tell you that oak is good for this. Be a real man and use mesquite. You’ll need to keep the heat at 225-250 for this one, and let’s go with a 3-2-1 smoking routine: 3 hours on the smoker unwrapped, 2 wrapped in foil (double layers of heavy duty foil and don’t put the creases down or the juice will fall out), 1 hour wrapped in the cooler. Depending on the size of the rack or how your heat fluctuates, you may need to increase to a 4-2-1 or even a 4-3-1. What you are looking for is to be able to grab onto the end of a rib bone, jiggle, and have the rib bone come out with little effort. Once the connective tissue melts down, this should be an easy feat.
Put the ribs concave side down (that’s the side we pulled the silverskin off of). As the rack cooks, the concave will relax because the connective tissue next to the bone will melt into the meat. You’ll want to put the rack away from the fire because the bone will burn really quickly if you aren’t careful. With five hours of smoke time, the ribs will have ample heat/time to cook so don’t worry about that. Again, don’t forget the trimmings…throw them right on top of the rack of ribs and let them cook. They have some fat, so the fat will melt into the meat.

After 3-4 hours, you should have a nice bark around the edges (but not scorched) and a nice red-brown color to the meat.

At this point, go ahead and wrap it up with heavy duty foil. Wrap it twice and make sure the juices can’t drip out.


You’ve got another 2-3 hours at 225-250 to let these cook in their own juices…a rib confit, so to speak.

This is one of the most beautiful sights in the world…hours of smoke turn the aluminum gold. I think it may be the work of God.

At some point, you’ll need to CAREFULLY unwrap the rack just enough to get access to the bone so you can do your jiggle test. If you spill any of that juice, I swear to you I’ll come to your house and cut your hair at the scalp with my pocketknife. DON’T do it.
After the rack passes the jiggle test, then the ribs need a good hour to three hour rest in a cooler. Take them directly (still wrapped in foil) from the heat and into a cooler. Don’t open the lid until you are ready to cut/serve. They will stay hot in the cooler, trust me. Whatever you do, don’t open the cooler for at least an hour. DON’T do it.
Take the ribs out, cut one of the ends of the foil right next to the rack and pour the juice out into a bowl. You should be able to squeeze the rack right out of the foil pouch now, so lay it up on a cutting board and cut them right in the middle between each rib (or two, depending on how many people you are serving). They are ready to eat, but if you want you can toss them in the juice. If you want them extra gooey and kinda sugary like one of those sissy Kentucky fellers, then coat them with your favorite BBQ. These are good enough without any sort of sauce. If you go with sauce, try to do one on your own or try one without a whole bunch of sugar, like Stubb’s (which is my favorite bottled bbq sauce).
Tah. Dah. Big Red Ribs.


